Introduction & What Is Wazuh
EDR?, XDR?, SIEM? do these acronyms just sound like a bunch of gibberish?
 These are very simple concepts made difficult by excessive use of acronyms.
Let's see what each of these means.
These are very simple concepts made difficult by excessive use of acronyms.
Let's see what each of these means.
1. Endpoint Detection and Response (EDR)
This is the simplest and most basic form of defense in any system. As the name suggests EDR monitors activity on individual devices like laptops, servers and workstations. It watches for malicious processes, file changes, registry modifications, and lateral movement on the endpoint itself.
(Lateral movement is a technique an attacker uses to progressively move through a network after gaining initial access, working towards their ultimate target. Before an attacker hops to another machine, they do significant work on the compromised endpoint itself like escalating privileges, harvesting credentials, and staging their next move. This is the local phase of lateral movement ie lateral movement within an endpoint.)
It works in two stages:
- Collect: Process trees, file activity, network connections from the device.
- Responds: Isolates a host, kill a process, roll back changes.
EDR is best if you want deep visibility into what's happening on a machine.
It is a minimum security tool every company must use.
Example tools are CrowdStrike Falcon, SentinelOne.
2. Extended Detection and Response (XDR)
As the name suggests, XDR is an extension of EDR.
EDR is scoped to a single endpoint only but XDR has a broader scope
of endpoints + networks + cloud + email + identity.
XDR correlates *telemetry across the entire environment.
Instead of getting alerts from each tool, XDR stitches every alert
to give the complete story.
(WHAT IS TELEMETRY? It is the automated process of collecting data from remote sources and transmitting them to a central location for monitoring and analysis).
XDR's two step process is:
- Collects: endpoints, network traffic, email, cloud workloads, identity providers.
- Responds: coordinated response across multiple layers simultaneously.
It is best for reducing alert fatigue and seeing the full kill chain. Examples are Palo Alto Cortex XDR, Trend Vision One (which is the flagship product of trend micro), Wazuh platform etc.
3. Security Information and Event Management (SIEM)
We saw EDR was scoped to an endpoint, XDR extended the scope to emails, clouds, network and identity providers. This still does not cover the entire network of an organization, we expand the scope further now and introduce SIEM. While EDR zooms in on individual devices and XDR connects the dots between a few critical security layers, a SIEM (pronounced "sim") acts as the ultimate brain of a Security Operations Center (SOC). SIEM tools do not just monitor endpoints or networks, they ingest massive quantities of log data from absolutely everywhere in an enterprise ecosystem. This includes domain controllers, firewalls, databases, switches, antivirus software, and custom applications.
A SIEM serves two primary functions:
- Log Aggregation & Management: Gathering, normalizing, and archiving terabytes of historical logs from diverse sources into a central, searchable repository.
- Security Analytics & Correlation: Running complex, real-time query rules across those logs to catch sophisticated threats that look innocent in isolation but reveal an attack when viewed together.
The Correlation Difference: If a single user fails a login on a laptop, EDR notes it locally. If that same user fails a login across 40 different servers and a firewall simultaneously, a SIEM flags it as a coordinated brute-force attack.
So why even bother with XDR if SIEM has a broader scope?
→ SIEM has broader visibility and centralized log analysis,
while XDR focuses on deeper detection and faster automated response across
integrated security tools.
NOTE: A big misconception is that SIEM is a passive tool that
cannot take automated action.
SIEM platforms can absolutely support automated actions,
especially when integrated with SOAR.
SOAR stands for Security Orchestration, Automation, and Response.
It is a stack of software solutions that allows organizations to
streamline their security operations by integrating disjointed tools,
automating repetitive tasks, and executing predefined incident response
workflows without human intervention.
Introducing Wazuh
Wazuh is a popular open-source security platform that began as a fork of
the OSSEC project. (learn more on ossec)
It has now evolved into a unified system by combining SIEM analytics with Host
Intrusion Detection and EDR/XDR capabilities.
Key capabilities of Wazuh
- Log Data Analysis: Wazuh agents extract raw log data from operating systems and applications, while the Wazuh Manager uses built-in "decoders" and rules to parse and alert on malicious behavior in real time.
- HIDS (Host-Based Intrusion Detection): It monitors system calls, handles rootkit/malware detection, and spots anomalies or indicators of compromise (IoCs) occurring directly on your infrastructure.
- File Integrity Monitoring (FIM): FIM tracks sensitive directories and registry keys. If an unauthorized user or process creates, modifies, or deletes a critical system file, Wazuh logs the user ID, the application responsible, and triggers an immediate alert.
- Vulnerability Detection: The Wazuh agent inventories all installed software on an endpoint and correlates it with continuously updated CVE (Common Vulnerabilities and Exposures) databases, highlighting unpatched security flaws automatically.
- Regulatory Compliance: Out of the box, Wazuh maps its alerts and Security Configuration Assessments (SCA) to major compliance frameworks. Dashboard views can be filtered cleanly by specific control tags for PCI DSS, HIPAA, GDPR, and NIST 800-53, making it incredibly easy to provide audit-ready proof to regulators.
Wazuh Architecture Overview: How Wazuh Works Internally
Wazuh has four primary components:
- Wazuh server (Manager + Filebeat)
- Indexer
- Dashboard
- Agent
To understand all these, let's take a look at how things flow within wazuh.
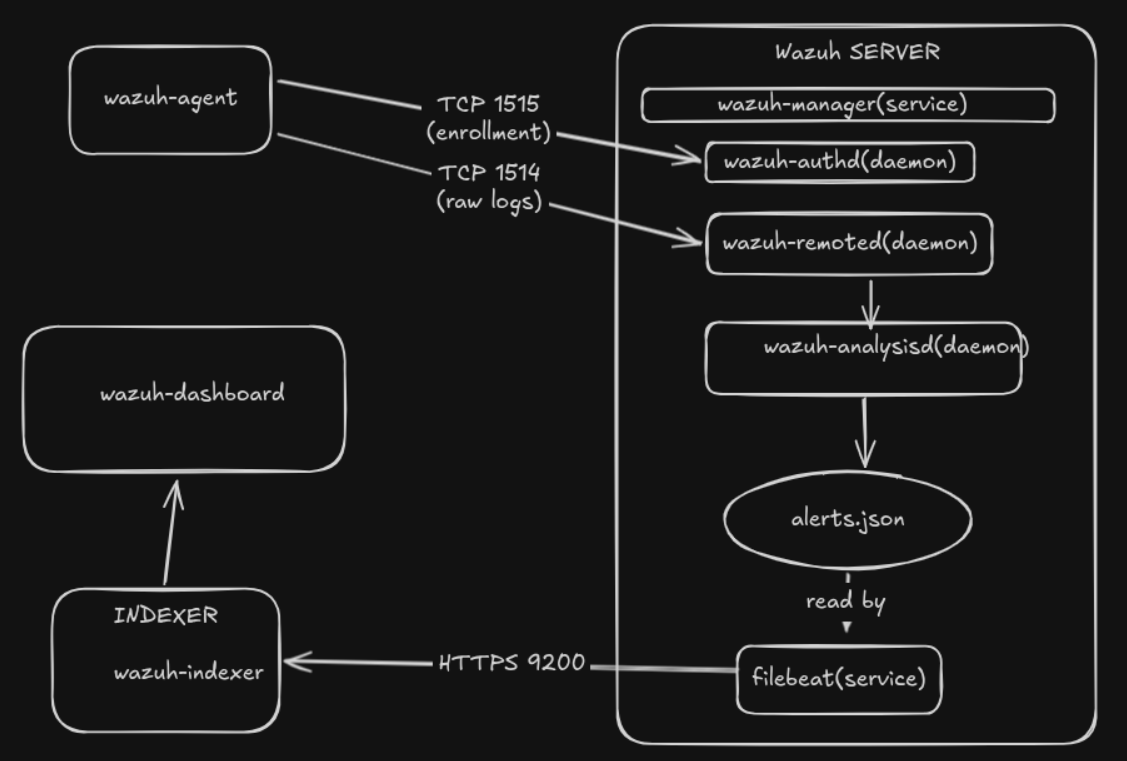
Wazuh Agent
This is the program that is installed on all clients (endpoints). These agents collect
logs and send the raw logs to the wazuh server.
The primary service is: wazuh-agent
Important files of agent
/var/ossec/etc/ossec.conf— Main agent config/var/ossec/logs/ossec.log— Agent logs/var/ossec/etc/client.keys— Authentication key/var/ossec/queue/— Event queues/var/ossec/etc/shared/— Shared configs from manager
The agent communicates with the manager using 2 ports:
TCP port 1514 for agent event/log forwarding
TCP port 1515 for agent enrollment
Overwhelmed? Don't be — we will cover all of these during our lab setup section.
Wazuh Manager
The main service is: wazuh-manager
The roles of the Wazuh manager (and the daemons that perform specific roles) are:
| Daemon | Purpose |
|---|---|
| wazuh-remoted | Receives agent logs |
| wazuh-analysisd | Decoding and rule engine processing |
| wazuh-authd | Agent enrollment and authentication |
| wazuh-db | Agent database management |
| wazuh-monitord | Monitoring and log rotation |
| wazuh-modulesd | Runs modules like Syscollector and vulnerability detection |
| wazuh-execd | Executes active response actions |
| wazuh-integratord | Handles external integrations |
| wazuh-maild | Sends email alerts |
| wazuh-csyslogd | Syslog forwarding service |
| wazuh-agentlessd | Agentless monitoring |
| wazuh-logcollector | Collects local logs |
| wazuh-apid | Provides REST API services |
| wazuh-syscheckd | File Integrity Monitoring (FIM) |
| wazuh-rootcheck | Rootkit and malware detection |
How Logs Flow From Agents To Server
Step 1 — Agent Collects Logs
wazuh-logcollector reads logs from:
- /var/log/auth.log
- Windows Event Logs
- Apache logs
- Syslog
- Custom application logs
Configured inside:
<localfile>
  <location>/var/log/auth.log</location>
  <log_format>syslog</log_format>
</localfile>
File location:
/var/ossec/etc/ossec.conf
Step 2 — Agent Sends Logs
Agent sends events to the manager using:
1514/TCP
Handled by:
wazuh-remoted
Step 3 — Decoding
The manager passes logs to:
wazuh-analysisd
Analysisd uses:
- Decoders
- Rules
Decoders
Decoders parse raw logs into structured fields.
Example log:
Failed password for root from 192.168.1.5
Decoded result:
{
  "user": "root",
  "srcip": "192.168.1.5"
}
Important Decoder Locations
| Path | Purpose |
|---|---|
| /var/ossec/ruleset/decoders/ | Default decoders |
| /var/ossec/etc/decoders/ | Custom decoders |
Step 4 — Rules Engine
Parsed logs are matched against XML rules.
Rule Files
| Path | Purpose |
|---|---|
| /var/ossec/ruleset/rules/ | Default rules |
| /var/ossec/etc/rules/ | Custom rules |
Example Rule
<rule id="5710" level="5">
  <if_sid>5700</if_sid>
  <match>Failed password</match>
  <description>SSH authentication failed</description>
</rule>
Step 5 — Alert Generation
If a rule matches:
ALERT GENERATED
The alert includes:
- Rule ID
- Severity level
- Agent name
- Timestamp
- Full log
- MITRE ATT&CK mapping
- Compliance tags
Alert Files
| File | Purpose |
|---|---|
| /var/ossec/logs/alerts/alerts.log | Human-readable alerts |
| /var/ossec/logs/alerts/alerts.json | Structured JSON alerts |
Archive File
| File |
|---|
| /var/ossec/logs/archives/archives.json |
Filebeat
Service: filebeat
Filebeat is installed on the Wazuh server.
Its job:
Read alerts.json → Send to Indexer
Important Filebeat Files
| File | Purpose |
|---|---|
| /etc/filebeat/filebeat.yml | Main Filebeat config |
| /etc/filebeat/certs/ | TLS certificates |
| /usr/share/filebeat/module/wazuh/ | Wazuh module |
| /var/log/filebeat/ | Filebeat logs |
Filebeat Workflow
alerts.json
     ↓
Filebeat reads JSON
     ↓
Converts to OpenSearch docs
     ↓
Sends HTTPS requests
     ↓
Indexer stores documents
Port Used
| Port | Protocol |
|---|---|
| 9200 | HTTPS |
Wazuh Indexer
Service: wazuh-indexer
Based on:
- OpenSearch
- Elasticsearch lineage
Internal Components
| Component | Purpose |
|---|---|
| Index engine | Stores documents |
| Query engine | Searches alerts |
| Shards/replicas | Scalability |
| ISM | Index lifecycle management |
| REST API | Dashboard/API access |
Important Indexer Files
| File | Purpose |
|---|---|
| /etc/wazuh-indexer/opensearch.yml | Main configuration |
| /etc/wazuh-indexer/jvm.options | JVM memory settings |
| /usr/share/wazuh-indexer/ | Core binaries |
| /var/log/wazuh-indexer/ | Indexer logs |
Index Patterns
| Index | Purpose |
|---|---|
| wazuh-alerts-* | Security alerts |
| wazuh-archives-* | All raw events |
| wazuh-monitoring-* | Agent status |
| wazuh-statistics-* | Wazuh statistics |
How Indexing Works
Example JSON
{
  "rule": {
    "level": 5,
    "description": "SSH login failed"
  },
  "agent": {
    "name": "ubuntu-server"
  }
}
Indexer Processing
- Receives JSON over REST API
- Maps fields
- Creates searchable documents
- Stores data in indices
- Builds inverted indexes
Capabilities Enabled
- Fast searching
- Aggregations
- Dashboards
- Filtering
- Threat hunting
Wazuh Dashboard
Service: wazuh-dashboard
Based on:
- OpenSearch Dashboards
- Kibana-like interface
Important Dashboard Files
| File | Purpose |
|---|---|
| /etc/wazuh-dashboard/opensearch_dashboards.yml | Main dashboard configuration |
| /usr/share/wazuh-dashboard/plugins/wazuh/ | Wazuh plugin |
| /var/log/wazuh-dashboard/ | Dashboard logs |
Dashboard Communication
| Destination | Purpose | Port |
|---|---|---|
| Wazuh API | Manager information/configuration | 55000 |
| Wazuh Indexer | Alert search and visualization | 9200 |
Full End-to-End Event Flow
1.  Attacker attempts SSH login
          ↓
2.  auth.log updated
          ↓
3.  wazuh-logcollector reads log
          ↓
4.  Agent sends event to manager (1514/TCP)
          ↓
5.  wazuh-remoted receives event
          ↓
6.  wazuh-analysisd decodes log
          ↓
7.  Rules matched
          ↓
8.  Alert generated
          ↓
9.  alerts.json updated
          ↓
10. Filebeat reads alerts.json
          ↓
11. Sends HTTPS JSON to indexer (9200)
          ↓
12. Indexer indexes document
          ↓
13. Dashboard queries index
          ↓
14. Alert visible in UI
Important Wazuh Configuration Files
Core Files
| File | Purpose |
|---|---|
| /var/ossec/etc/ossec.conf | Main Wazuh configuration |
| /var/ossec/etc/client.keys | Agent authentication |
| /var/ossec/etc/local_internal_options.conf | Advanced tuning |
| /var/ossec/etc/internal_options.conf | Internal settings |
Rules and Decoders
| Path | Purpose |
|---|---|
| /var/ossec/ruleset/rules/ | Default rules |
| /var/ossec/etc/rules/ | Custom rules |
| /var/ossec/ruleset/decoders/ | Default decoders |
| /var/ossec/etc/decoders/ | Custom decoders |
Logging Files
| File | Purpose |
|---|---|
| /var/ossec/logs/ossec.log | Main manager log |
| /var/ossec/logs/alerts/alerts.json | Structured alerts |
| /var/ossec/logs/alerts/alerts.log | Text alerts |
| /var/ossec/logs/archives/archives.json | All archived logs |
Installation: Server & Dashboard
Now we will setup a simple home SOC Lab with wazuh. First we will setup the Wazuh server, then we will deploy Linux and Windows agents. We will not only setup the lab but understand each and everything about what we are doing.
The installation process of wazuh is pretty straightforward. I am using an Ubuntu 24.04 server VM to install my Wazuh server (manager + indexer + Dashboard).
You can install the Wazuh indexer, Wazuh server, and Wazuh dashboard on a single host or distribute them in cluster configurations.
Installing these components in different hosts is not a complicated job. We have already seen how agents communicate to managers, how managers communicate to indexer and how indexers communicate with the dashboard, the same concept applies.
An important thing to note is that redundancy can be introduced. I will briefly introduce this concept now.
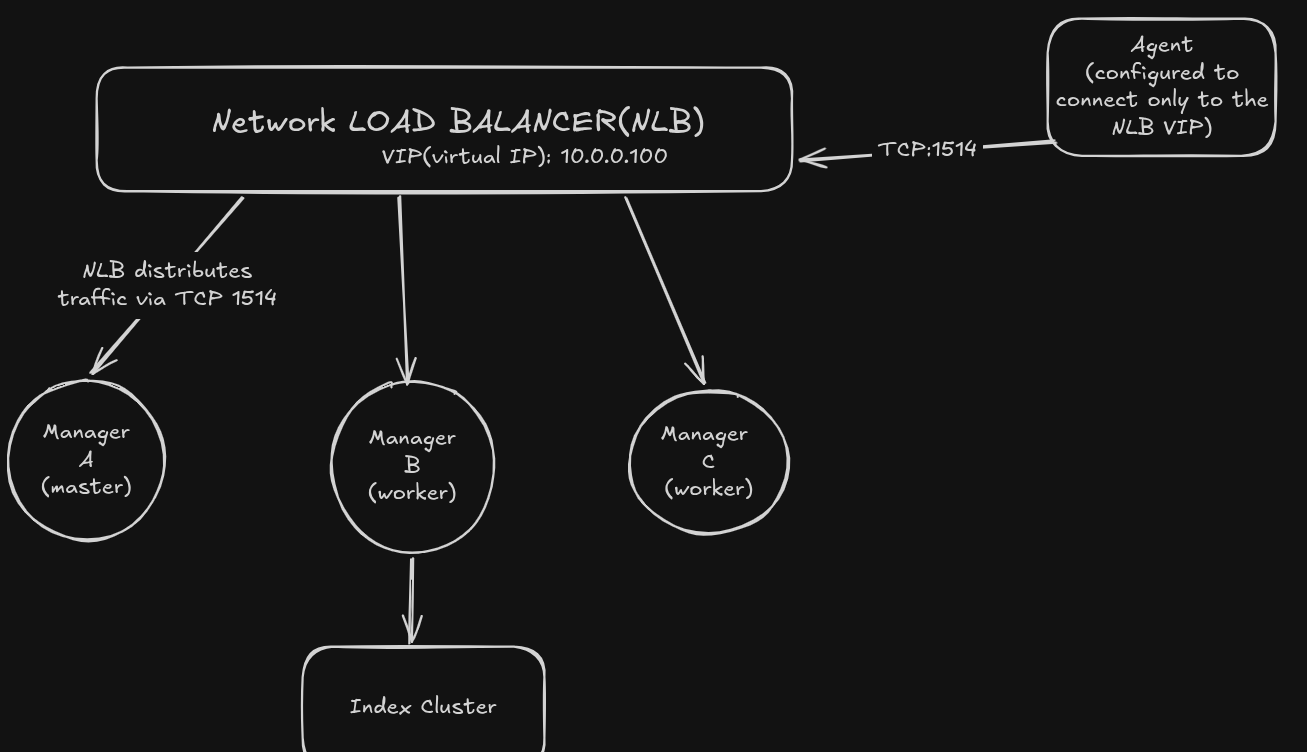
1. Wazuh Manager Layer (Active-Worker Cluster)
Unlike the backend database, the Wazuh Manager layer does not operate in a traditional "multi-master" fashion. Instead, it operates on a Master/Worker protocol.
- The Master Node: Acts as the central authority. It handles agent enrollment (authd), coordinates configuration files (shared groups, rules, decoders), and pushes global states down to the worker nodes.
- The Worker Node: Do the heavy lifting. They receive raw log events from agents, decode them, and run them against the analysis engine to generate alerts.
- Redundancy Mechanics:
- Agent Failover: A Network Load Balancer (NLB) is typically placed in front of the Wazuh Managers (listening on TCP port 1514). Wazuh agents connect to the VIP (Virtual IP) of the load balancer, which distributes traffic across all active workers and the master. If a manager node dies, the NLB dynamically shifts agent traffic to the healthy managers
- Manager Synchronization: Worker nodes send periodic keep-alives to the master. If a worker accepts an enrollment request from an agent, it uses an internal thread called sendsync to forward that registration to the master, which then replicates the new agent keys back out to all workers.
2. Wazuh Indexer Layer (Distributed Search Cluster)
The Wazuh Indexer is built on OpenSearch, which utilizes a true distributed database design. To achieve proper redundancy and avoid split-brain scenarios, a minimum of 3 Indexer nodes is highly recommended.
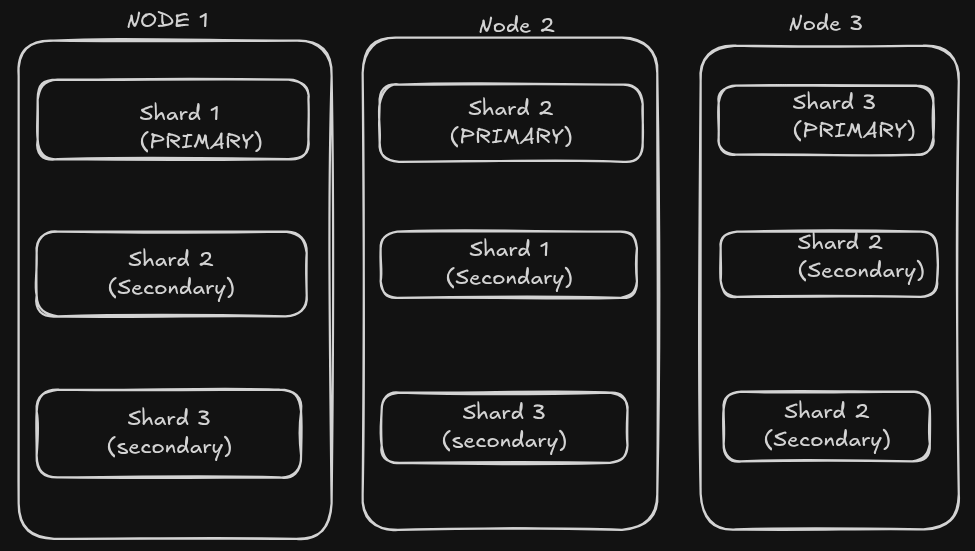
If you are interested in inverted index and how distributed index works I highly recommend you study apache lucene and opensearch/elastic search. Click here to understand lucene and elasticsearch- Sharding and Replication: When the manager generates an alert, it is sent to the Indexer cluster. OpenSearch splits these indices into Primary Shards and copies them into Replica Shards.
- Redundancy Mechanics:No two identical shards (Primary and its direct Replica) are stored on the same physical host.
- If Node 1 fails, Node 2 or Node 3 will instantly promote their replica shards to "Primary" status. Data ingestion and search capabilities continue without data loss.
- Quorum: With 3 nodes, if one host dies, the remaining 2 nodes maintain a quorum to elect a new cluster manager (master-eligible node) and track the state of the database safely.
Understanding these concepts are important. To install wazuh is very straightforward, just refer to the official docs here. Wazuh all-in-one(manager, indexer and dashboard in single computer) installation guide.
I will be installing the wazuh server(manager + filebeat), wazuh indexer and the wazuh dashboard in my Ubuntu server which has IP address 192.168.122.181
Refer to the docs here for the official wazuh all in one installation docs. Make sure you assign enough resources(Memory, Storage, CPU) to your VM according to the specifications mentioned in the docs.
The Recommended Operating Systems for your wazuh servers are:
- Amazon Linux 2, Amazon Linux 2023
- CentOS Stream 10
- Red Hat Enterprise Linux 7, 8, 9, 10
- Ubuntu 16.04, 18.04, 20.04, 22.04, 24.04
Run the command:
curl -sO https://packages.wazuh.com/4.14/wazuh-install.sh && sudo bash ./wazuh-install.sh -a
and simply wait.
The wazuh server(Manager + Filebeat), indexer and dashboard will be installed on your machine.
After the installation is complete, you will be provided a default username and password to access your dashboard, note this somewhere and keep it safe.
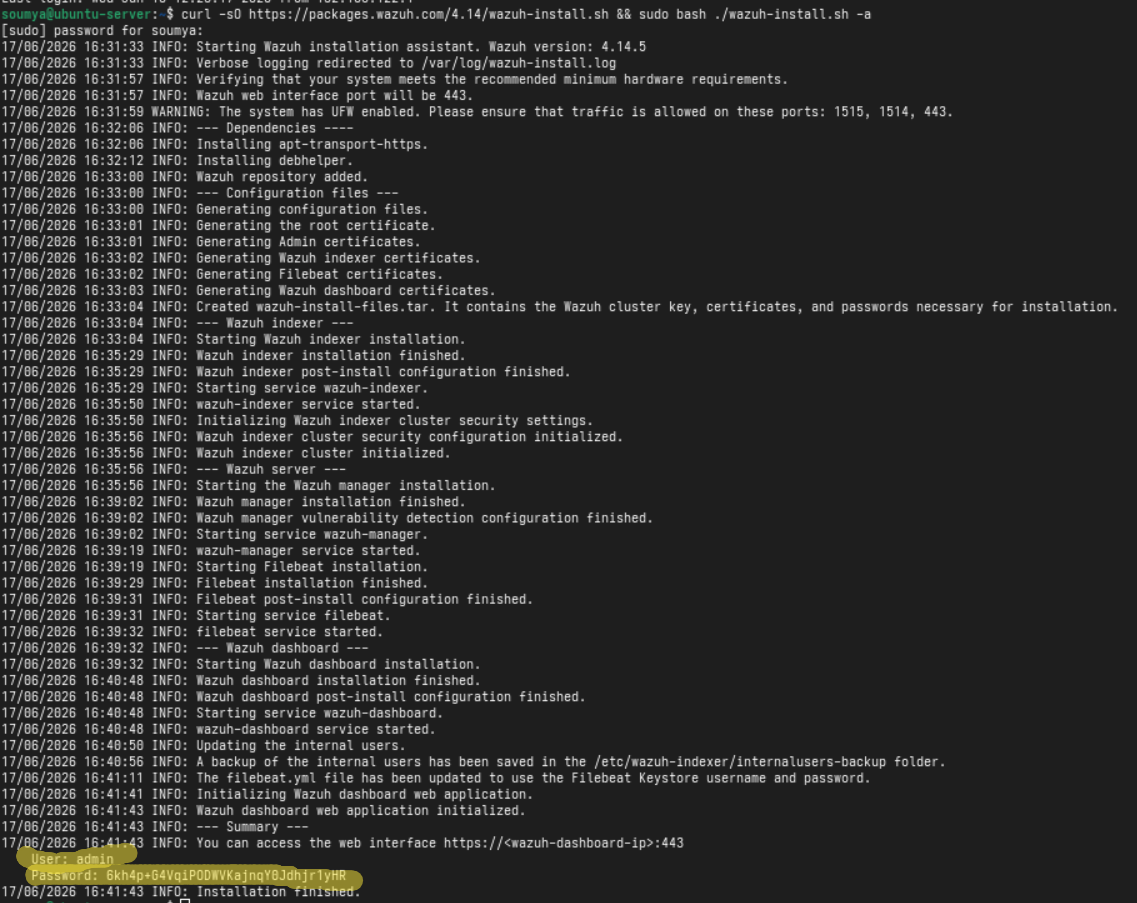
The installation is complete and the services are up. The server, indexer and dashboard services will
start automatically if installation is successful, to check if the services are running or not run
systemctl status wazuh-manager
The service should be active. Similarly do:
systemctl status wazuh-indexer
systemctl status wazuh-dashboard
If any one of these services are not active, activate them using the command:
systemctl start wazuh-manager
systemctl enable wazuh-manager
Similarly do for indexer and dashboard as well.
Now we can access the wazuh dashboard from any computer that is on same network as the machine you installed your
wazuh dashboard in. In my case it's my Ubuntu server VM with ip address 192.168.122.181.
But I will be accessing the dashboard from my fedora host. To do this, go to your browser and enter
wazuh-dashboard-ip:443
In my case this will be:
192.168.122.181:443
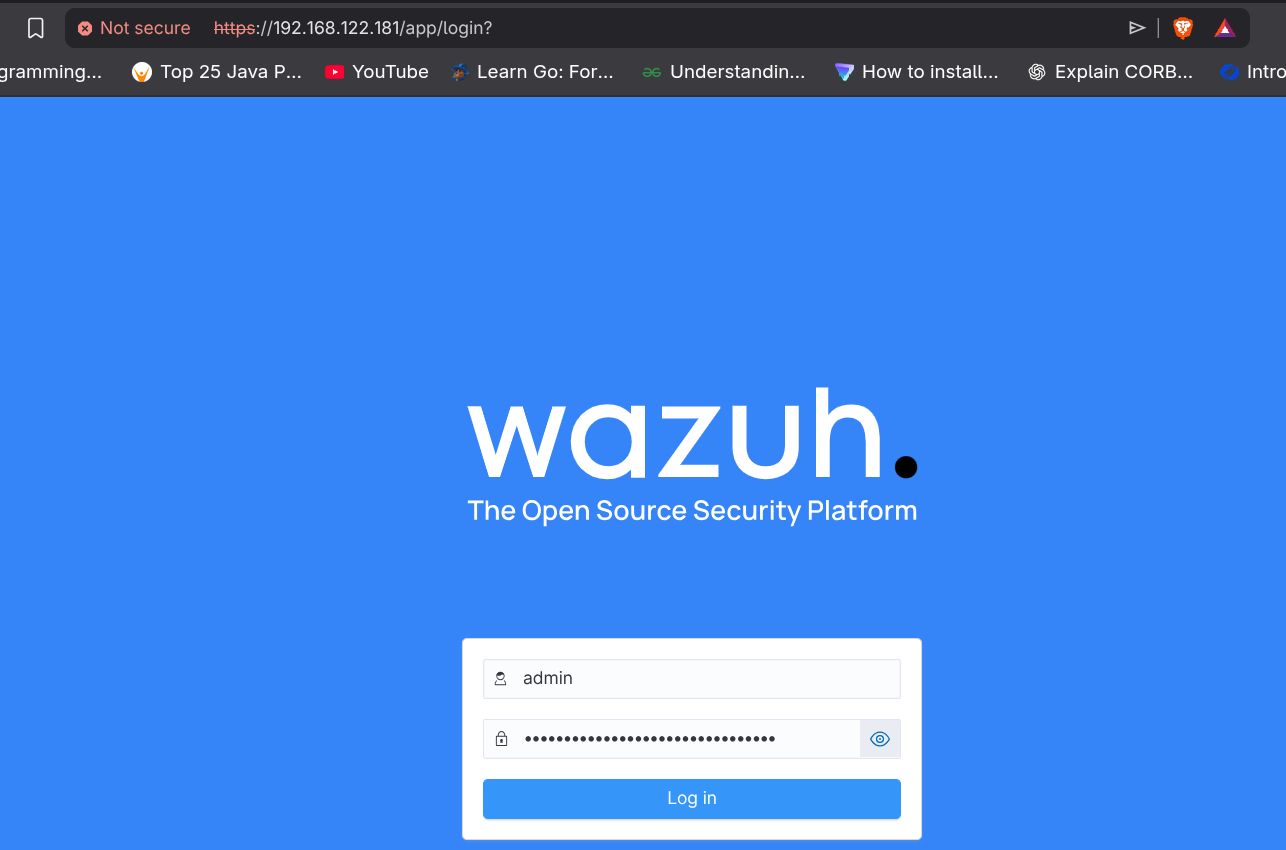
You will get the wazuh login page, enter the default username and password that you noted down earlier to log in.
 After some checks you will be able to see your wazuh dashboard.
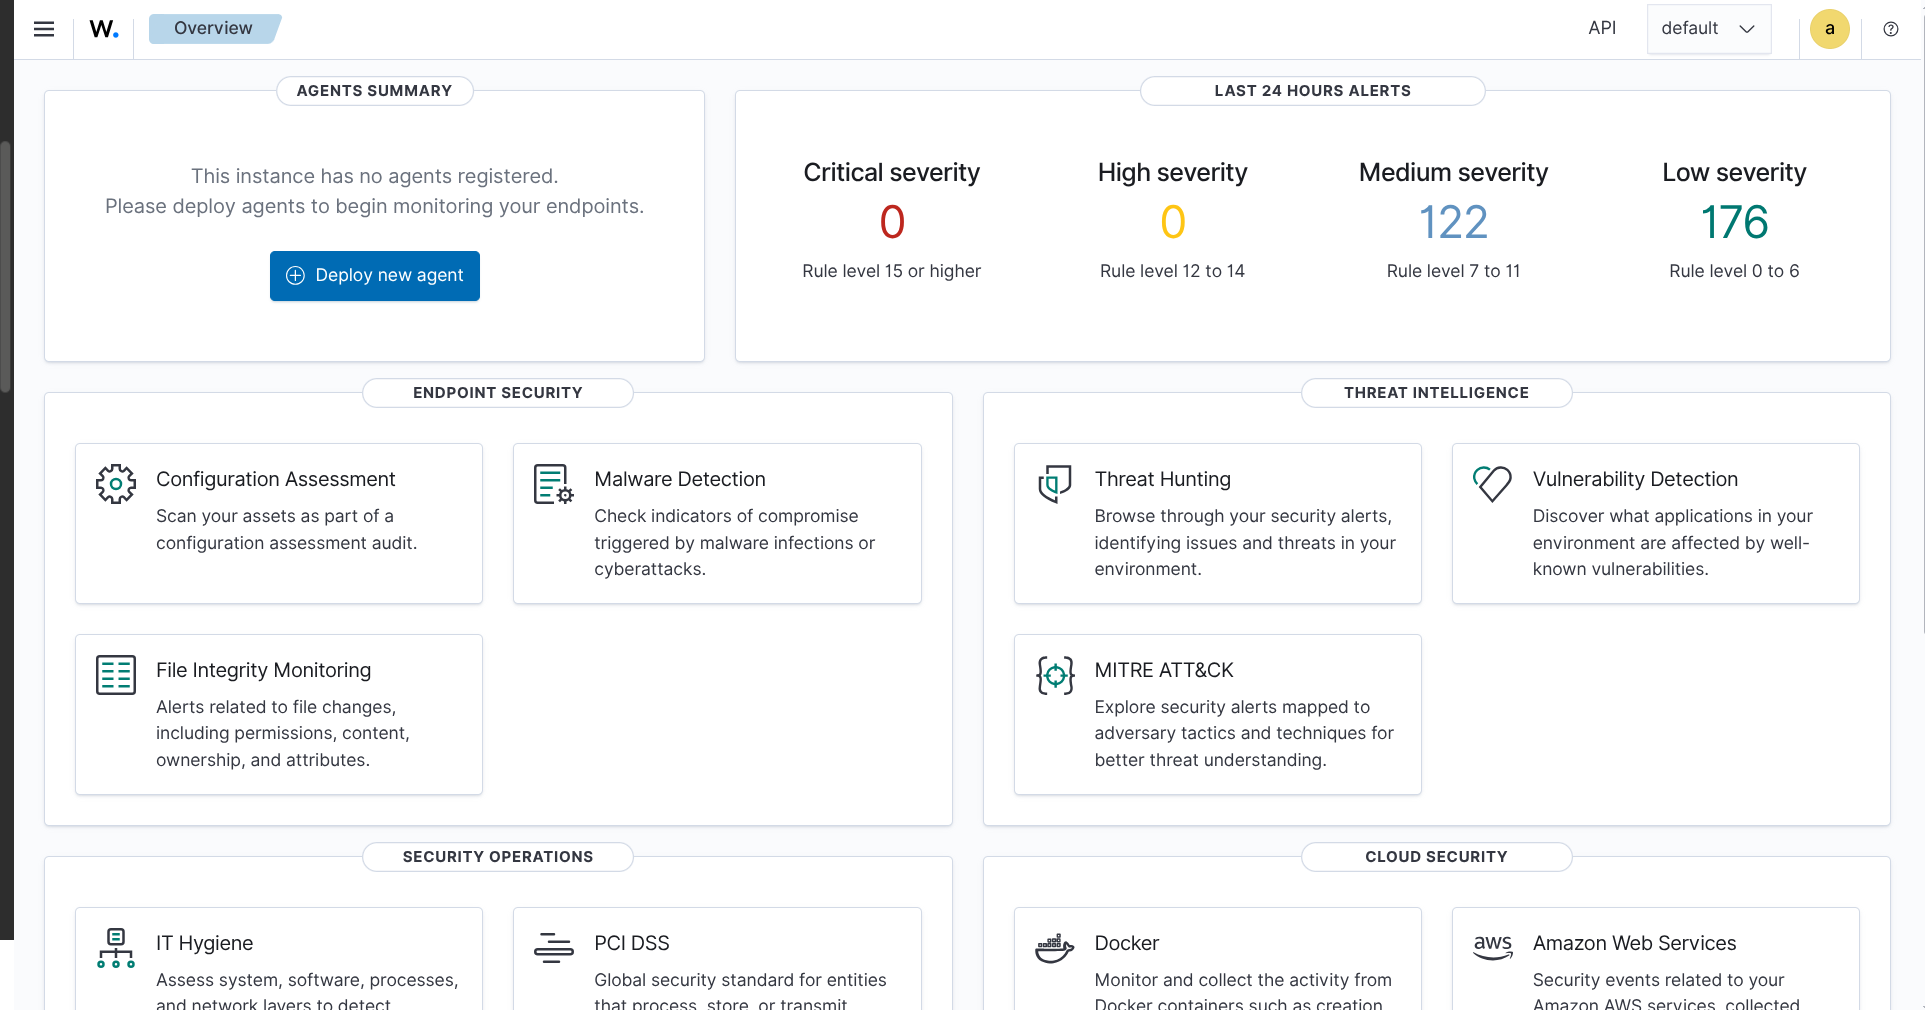 Before moving on to agents deployment I recommend you navigate this dashboard a bit and understand the
basics of security like TTP(Tactics, techniques and Procedure) and MITRE ATT&CK framework.
Before moving on to agents deployment I recommend you navigate this dashboard a bit and understand the
basics of security like TTP(Tactics, techniques and Procedure) and MITRE ATT&CK framework.
How to Deploy Wazuh Agents on Linux and Windows
Now we will see how to deploy wazuh agents in Linux and Windows machine. The process is pretty straightforward as all the commands will be provided to us, we simply need to run these commands.
Deploying a Linux agent
I will be deploying a wazuh agent in my kali Linux which has ip address 192.168.122.76.
The steps are:
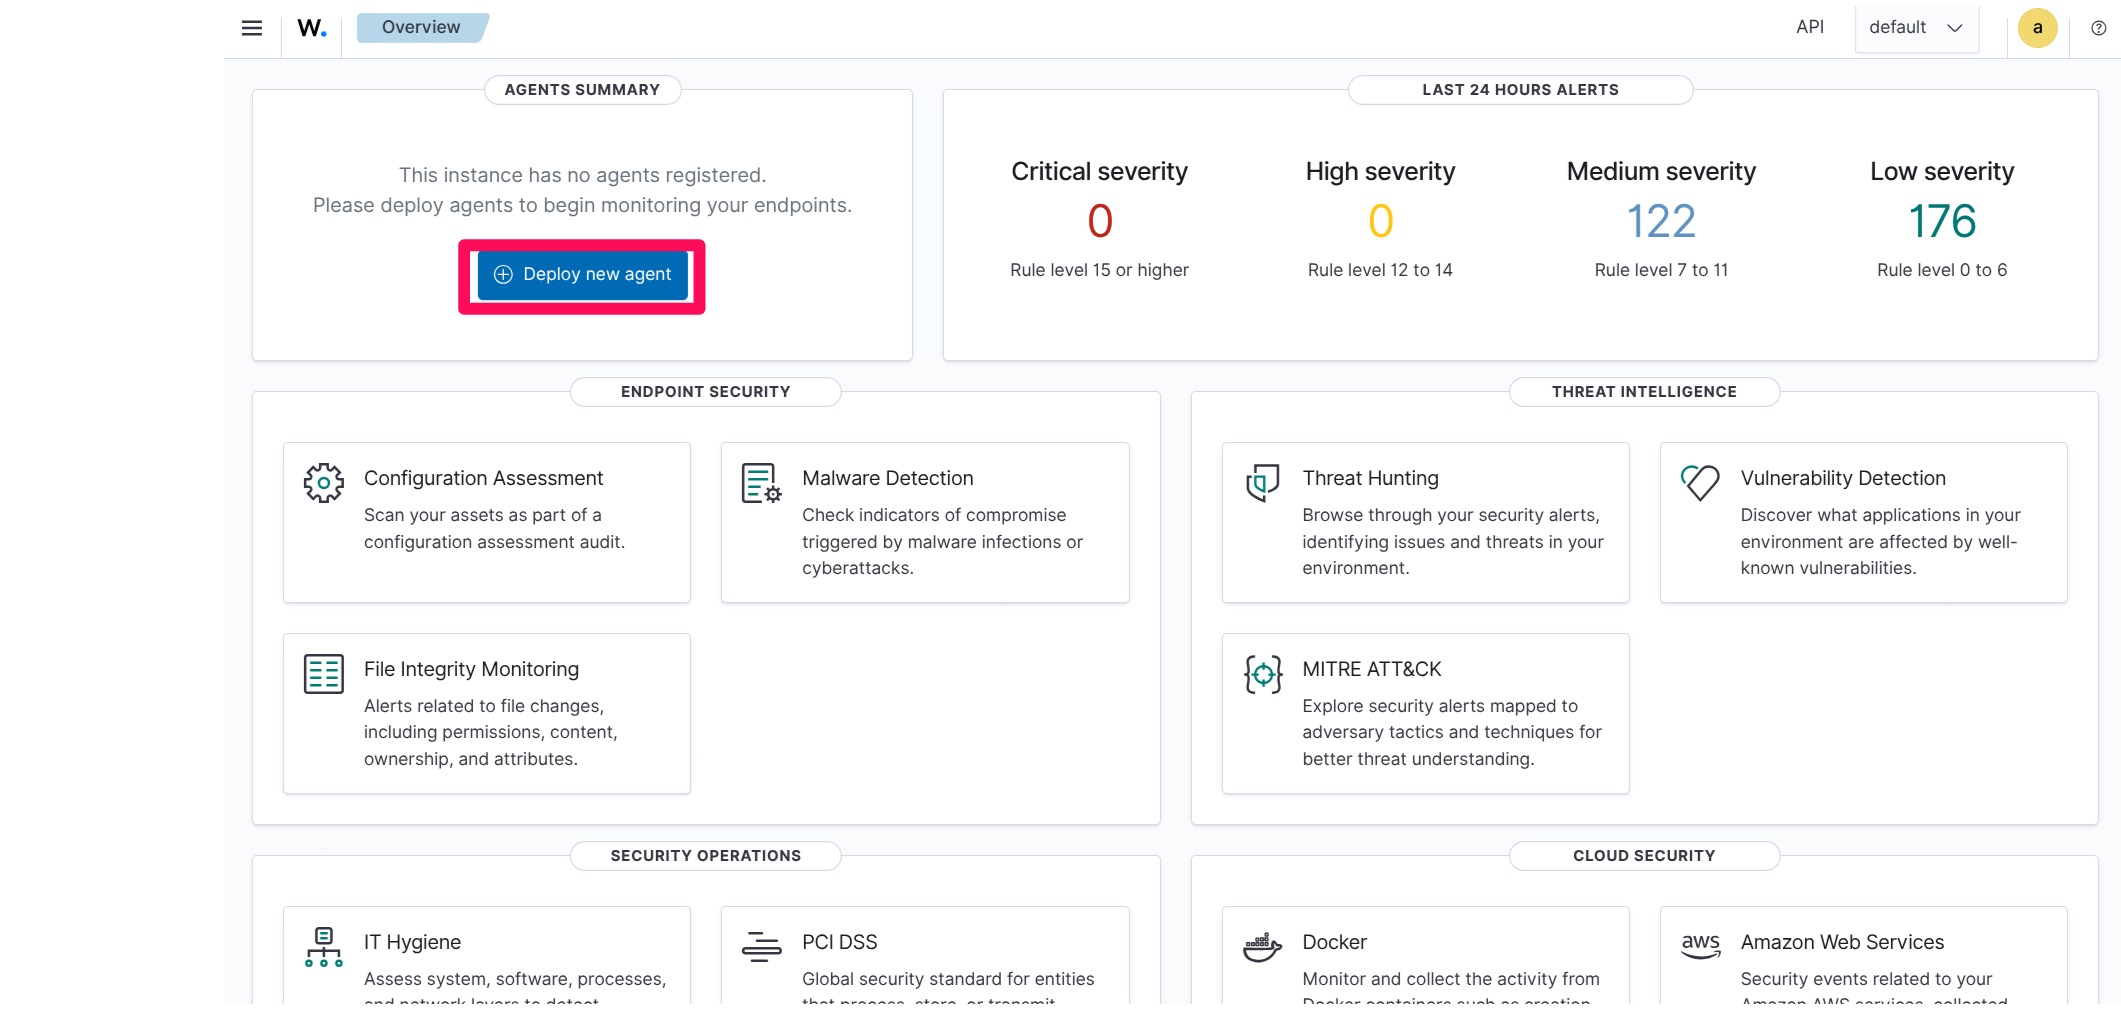
- Click 'Deploy new agent' button in the wazuh dashboard.
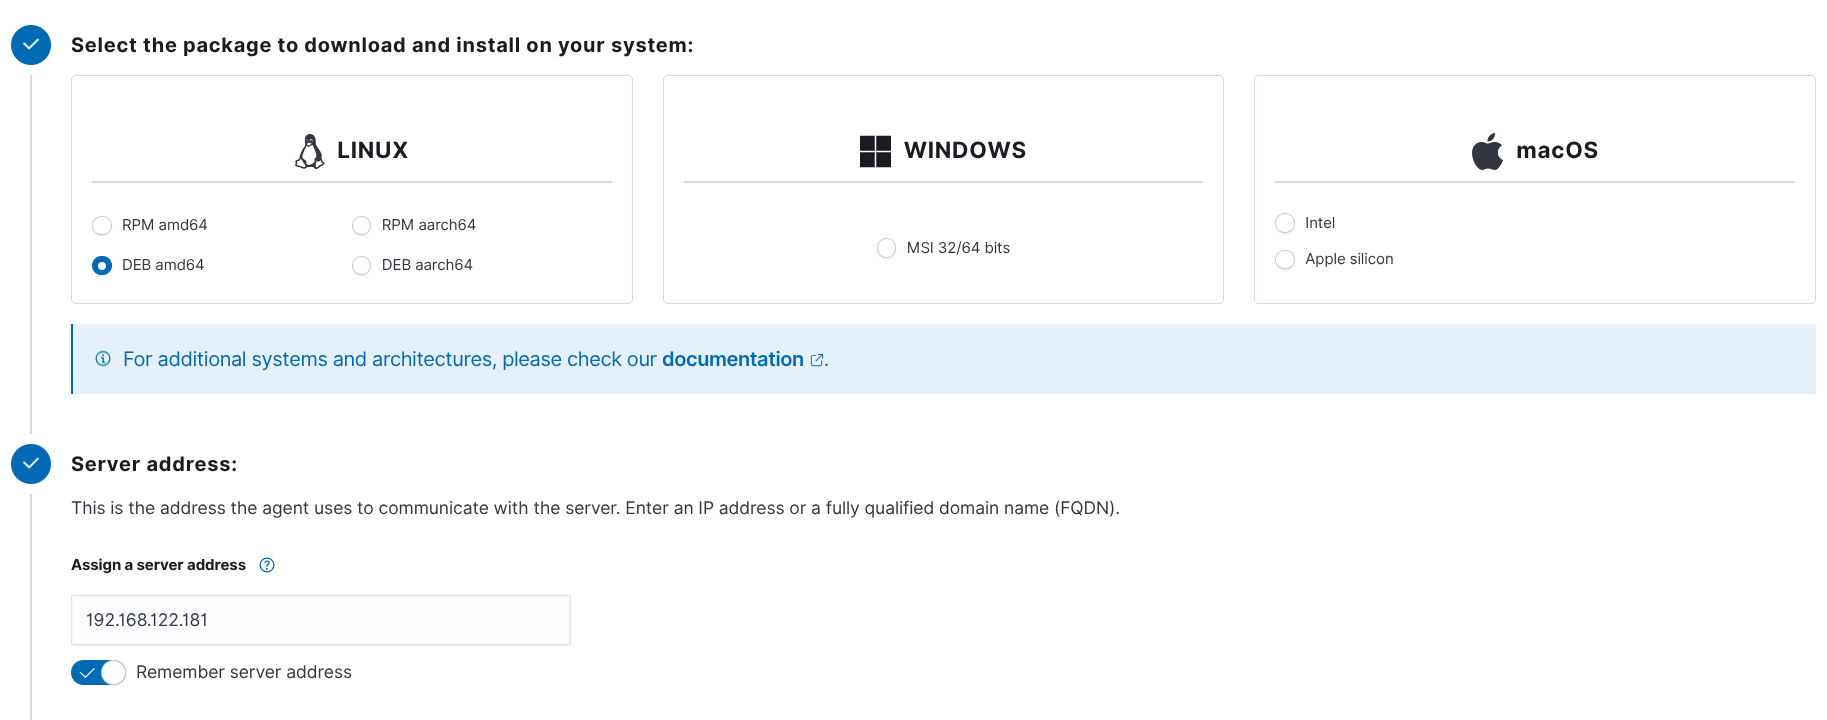
- Select the appropriate OS and architecture, (for Kali and 64 bit PC it is
'DEB amd64'(debian based 64 architecture PC)) and put in the IP address of the wazuh server(the computer
where you installed wazuh server, in my case it is 192.168.122.181).
- Provide a name to the agent if you want, I recommend you do.
- Wazuh will provide a code to deploy the agent simply run that code in the machine you want to deploy your
agent.
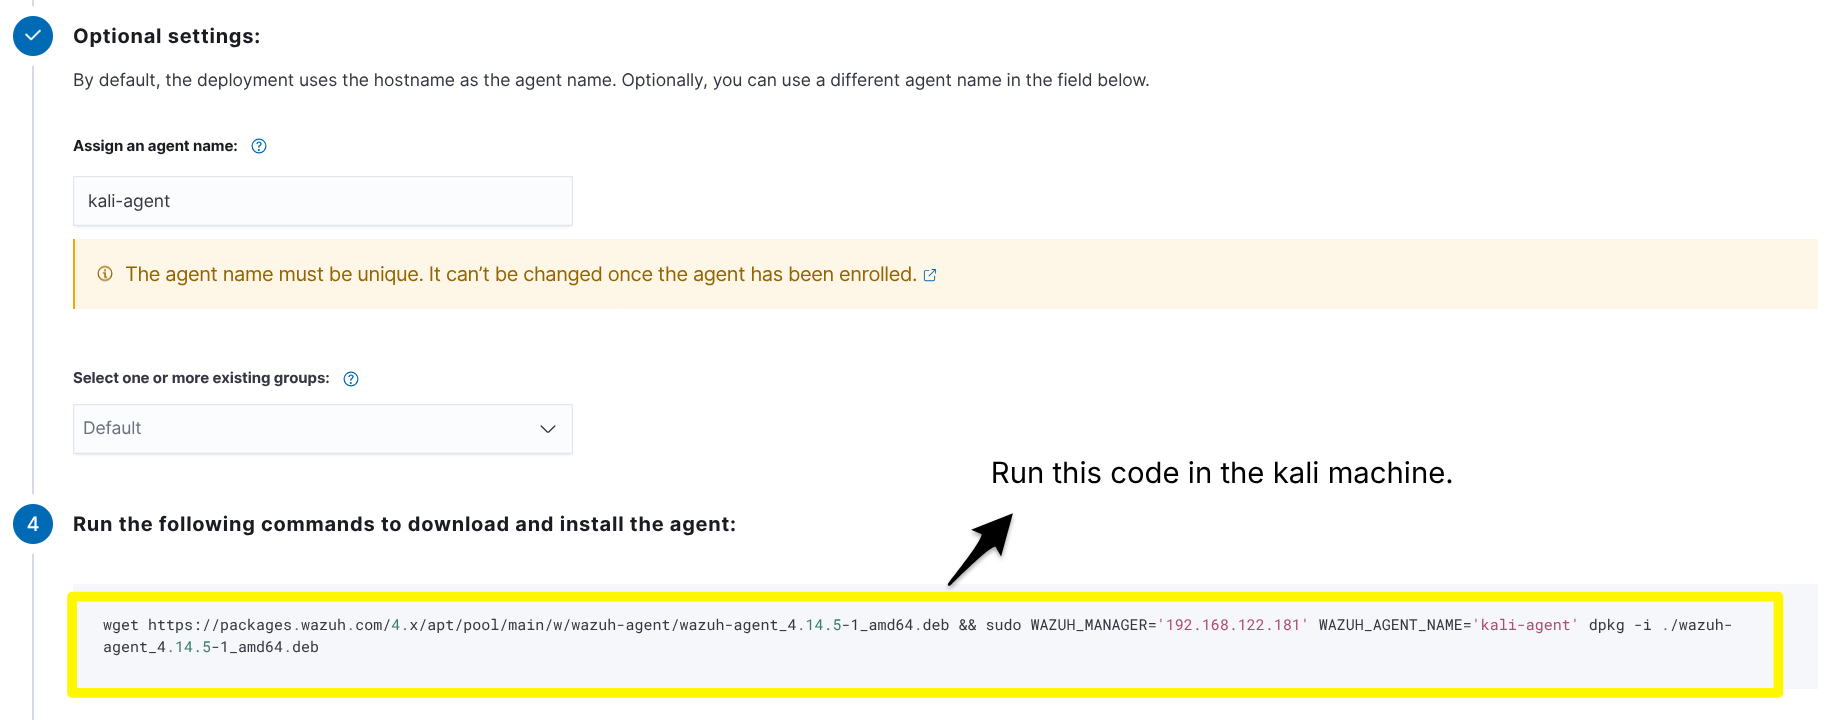
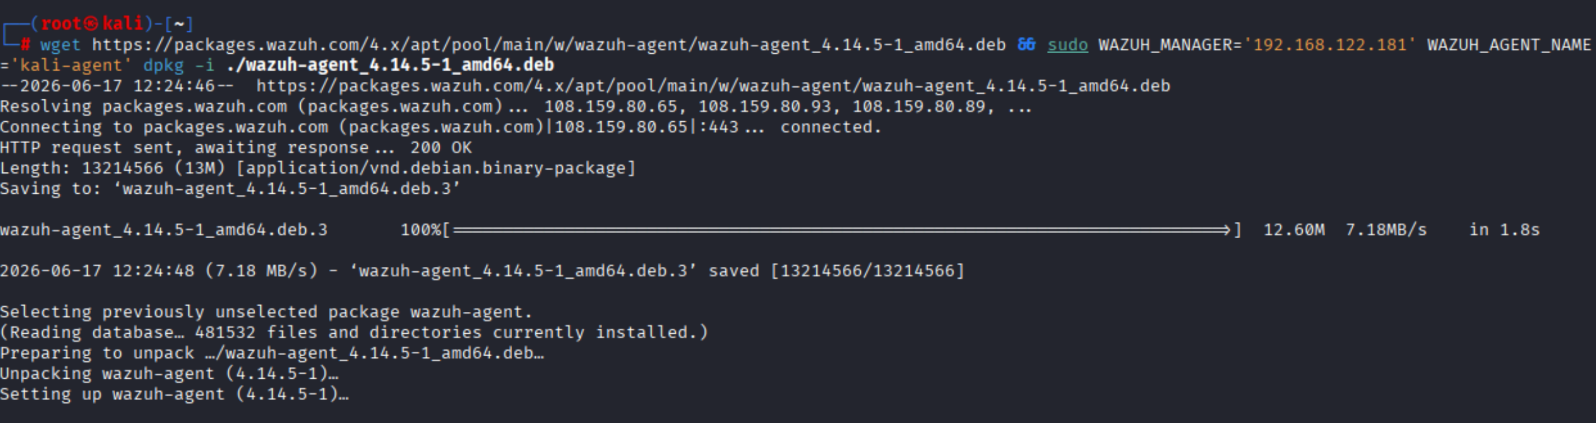
- After running the command on kali run:
sudo systemctl daemon-reload
sudo systemctl enable wazuh-agent
sudo systemctl start wazuh-agent
And check the status using:
sudo systemctl status wazuh-agent
The status should be active.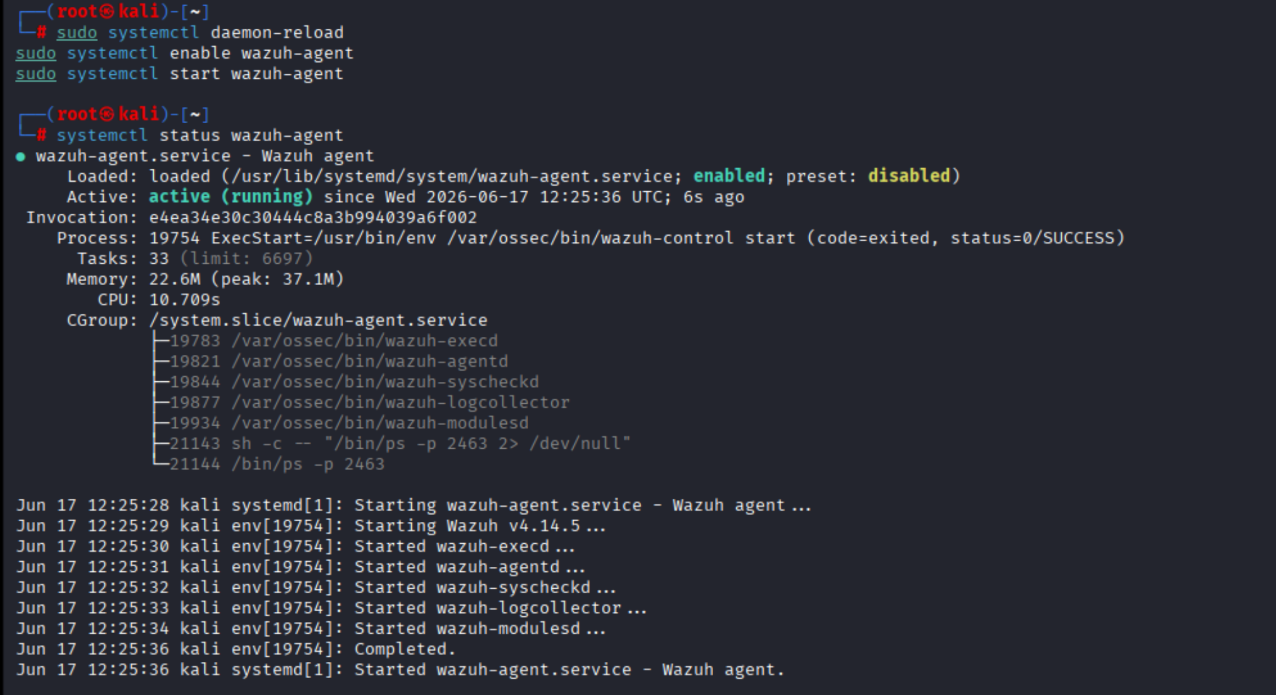
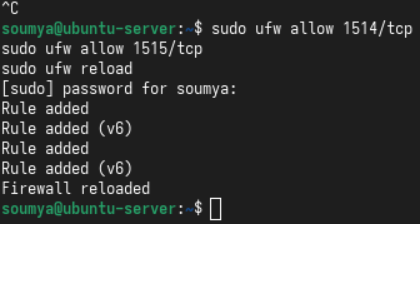
- If You are using UFW allow ports 1514 and 1515 tcp so that agent can communicate with the server.
sudo ufw allow 1514/tcp
sudo ufw allow 1515/tcp
sudo ufw reload
After the agent deployment, a direcotry will be created for wazuh at /var/ossec. This is the main configuration directory for wazuh. All the agents configs and logs will be available here. We will talk about this directory And some important files later.
After deploying the agent you will see the agents listed in the wazuh dashboard. Access the agent from the dashboard
by clicking on 'Active' under 'Agent Summary' section in your dashboard and then click your agent.
Wazuh will automatically run a scan on agents and show the vulnerabilities it found in the agent.
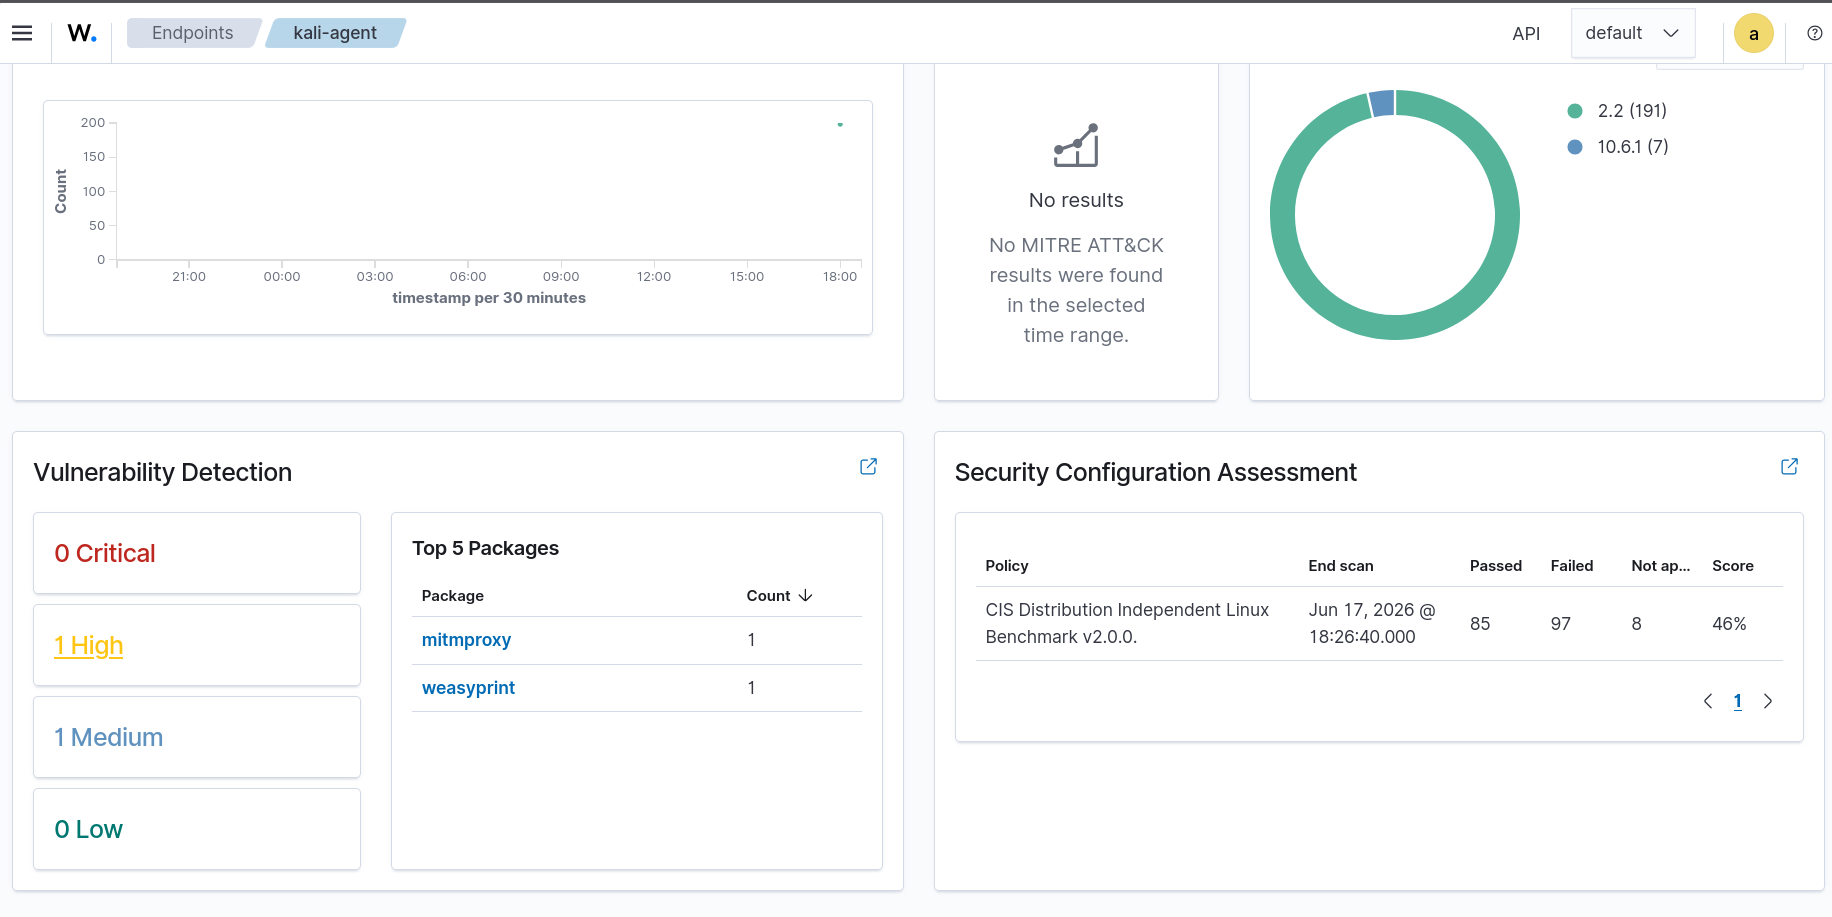 Click Critical, High, Medium or Low to see the vulnerabilities it found.
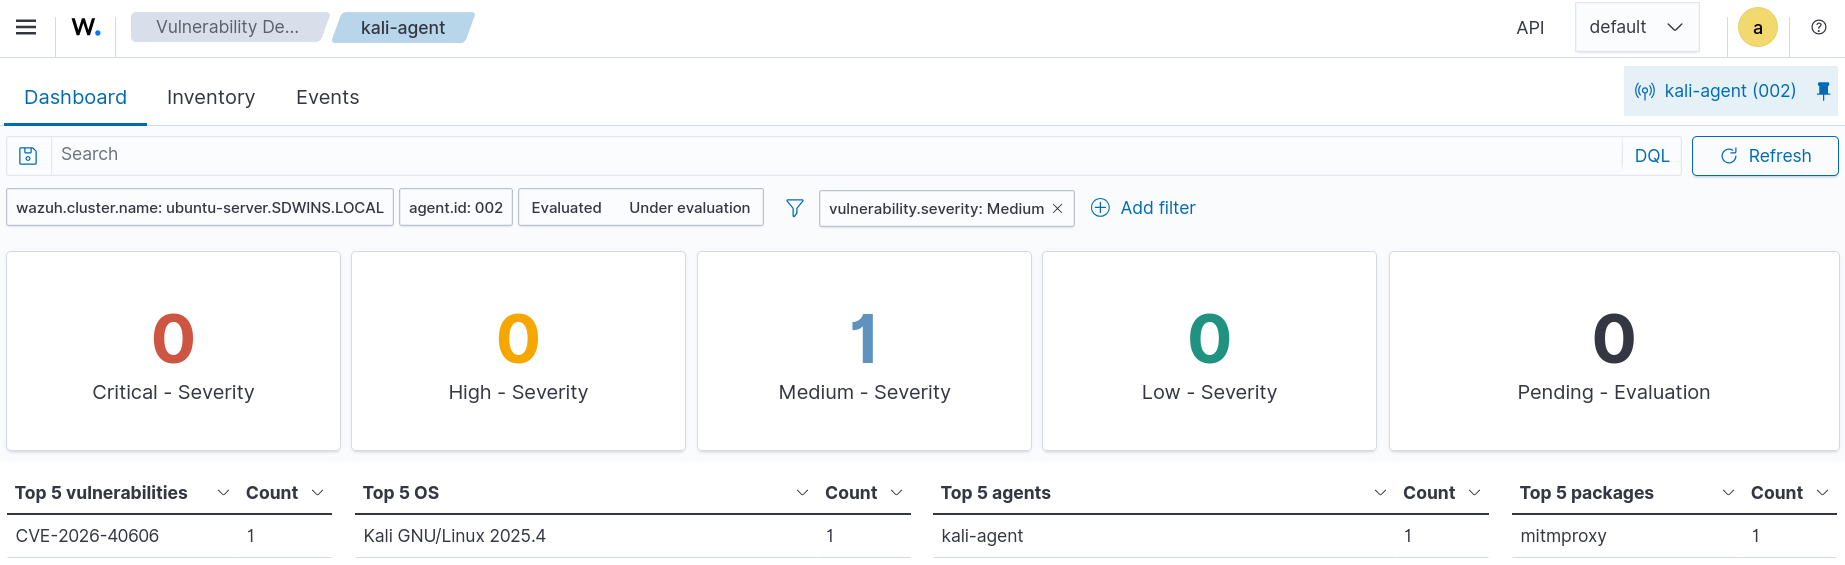 To really understand what this vulnurability is, what causes it and its fixes, notice the name of
the vulnerability ( written as CVE-2026-40606 in my case). CVE stands for Common Vulnerabilities and Exposures, it is basically
a database of all the common vulnerabilities that attackers exploit, its causes and fixes. To learn about
a certain CVE just type in that CVE code in google and learn what it is, what causes it and how to fix it. After
learning about the vulnerability you need to determine whether it is a false positive or true positive
To really understand what this vulnurability is, what causes it and its fixes, notice the name of
the vulnerability ( written as CVE-2026-40606 in my case). CVE stands for Common Vulnerabilities and Exposures, it is basically
a database of all the common vulnerabilities that attackers exploit, its causes and fixes. To learn about
a certain CVE just type in that CVE code in google and learn what it is, what causes it and how to fix it. After
learning about the vulnerability you need to determine whether it is a false positive or true positive
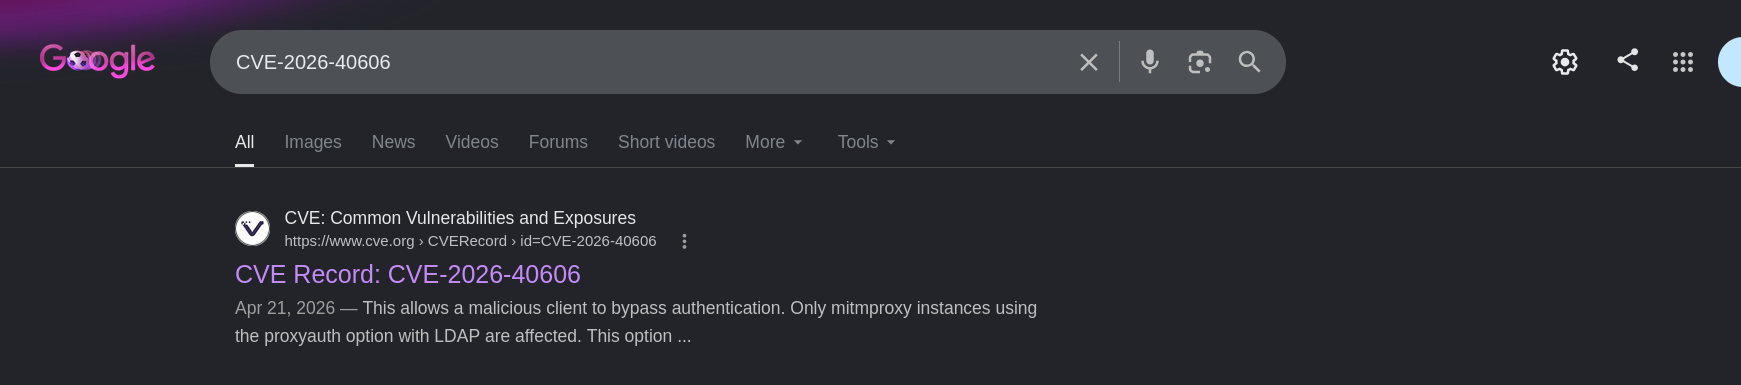 Click the first link to learn about the vulnerability. In my case it was an LDAP related vulnerability which I fixed in my kali.
For deploying agents in Windows, do exactly what we did here. Fill the information in the dashboard and execute the generated code in Windows Powershell as administrator. Then start the Wazuh agent(the code for this is also provided by Wazuh).
Log Collection & Analysis
I have already discussed the process of log generation by agents, transferring it to the server, decoding it, matching rules
and generating alerts along with all the important files here.
Logs are Generated by the Operating System and those logs are stored in fixed location. In Linux, logs are stored
in /var/log directory. The wazuh agents send these logs to the manager. We can configure what logs the
wazuh agent sends by modifying the <localfile> block of file /var/ossec/etc/ossec.conf, as
shown here.
Some important log files in Linux are:
📂 Core System & Security Logs
-
/var/log/syslogor/var/log/messages
Purpose: The central clearinghouse for system messages. Tracks everything from system startups to network glitches and application errors. (Ubuntu/Debian systems usesyslog; RHEL/CentOS/Fedora usemessages). -
/var/log/auth.logor/var/log/secure
Purpose: Tracks authorization and security events, including successful and failed SSH login attempts. (Ubuntu/Debian usesauth.log; RHEL/CentOS usessecure). -
/var/log/boot.log
Purpose: Contains all the messages printed to the screen while the system is booting up. Ideal for diagnosing startup hangs. -
/var/log/dmesg
Purpose: Contains kernel ring buffer messages. Primarily used to diagnose issues with hardware drivers and core kernel errors.
🌐 Network & Application Logs
-
/var/log/nginx/or/var/log/apache2/
Purpose: Web server traffic directories. Typically contain anaccess.log(every incoming request) and anerror.log(broken links, misconfigurations). -
/var/log/cron
Purpose: Logs scheduled background tasks (cron jobs). Check here if an automated script fails to execute. -
/var/log/mail.logor/var/log/maillog
Purpose: Tracks postfix, sendmail, or other mail server utilities running on the host.
👥 User Login History (Binary Logs)
These files are stored in a binary format and cannot be viewed with standard text editors. You must use the designated commands listed below:
| Log File Path | Purpose | Command to Read |
|---|---|---|
/var/log/wtmp |
Tracks historical records of all user logins and logouts. | last |
/var/log/utmp |
Tracks users who are currently logged into the system. | who or w |
/var/log/btmp |
Tracks failed login attempts (crucial for spotting brute-force attacks). | lastb |
/var/log/lastlog |
Shows the most recent login timestamp for all valid users. | lastlog |
⚙️ Modern Logs: Systemd and Journalctl
Modern Linux distributions utilize systemd to capture logs in a binary format inside /var/log/journal. Use the journalctl utility to query them:
# View system logs in real-time
journalctl -f

# View logs for a specific service (e.g., SSH)
journalctl -u ssh

# View only error logs from the current boot
journalctl -p err -blogrotate utility to automatically compress older files (e.g., syslog.1.gz). Use utilities like zless or zcat to view these archived text files without extracting them first.
After you have set this up, the flow of logs happen as discussed here and the wazuh
dashboard only displays alerts for logs that trigger a rule with a severity level of 3 or higher by default.
I have configured the localfile section of ossec.conf in my kali Linux agent as follows:
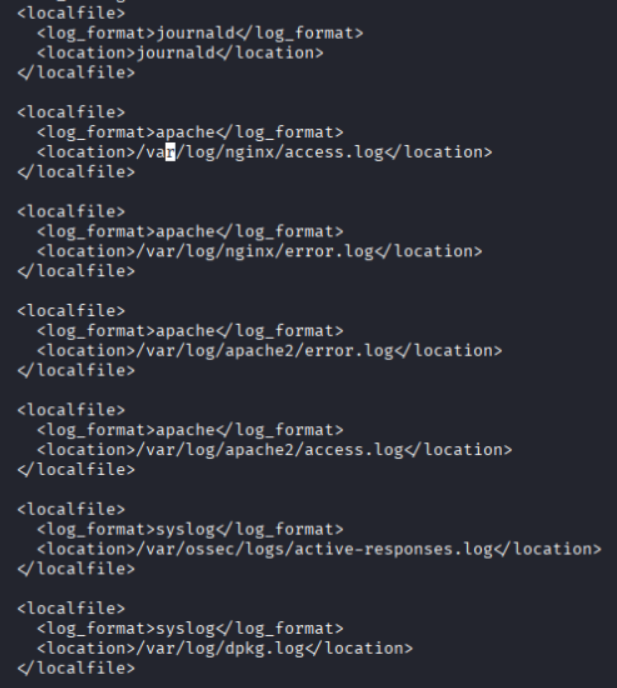 As you can see I have journald, apache and syslog tracked. 'journald' collects and stores log messages from the kernel, system services, and applications running on a Linux system
such as SSH login attempts, sudo usage, systemd service starts/stops, and kernel hardware errors.
As you can see I have journald, apache and syslog tracked. 'journald' collects and stores log messages from the kernel, system services, and applications running on a Linux system
such as SSH login attempts, sudo usage, systemd service starts/stops, and kernel hardware errors.
Let's try to trigger an alert by entering wrong sudo password three times and see the alert in the wazuh dashboard.
When you enter a wrong sudo password 3 times, PAM and sudo both log the failure and journald captures it.
PAM(Pluggable Authentication Modules) is a Linux framework
that handles authentication for applications and services.
Instead of each app implementing its own login logic, they all delegate to PAM,
which checks passwords, enforces limits, and logs results. For example, when you run sudo,
it's PAM that actually verifies your password and decides whether to allow or deny access.
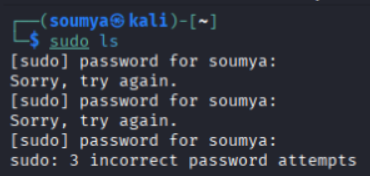 To see the alert go to your wazuh dashboard and click 'Threat Hunting':
 Now click 'Events' and see the log:
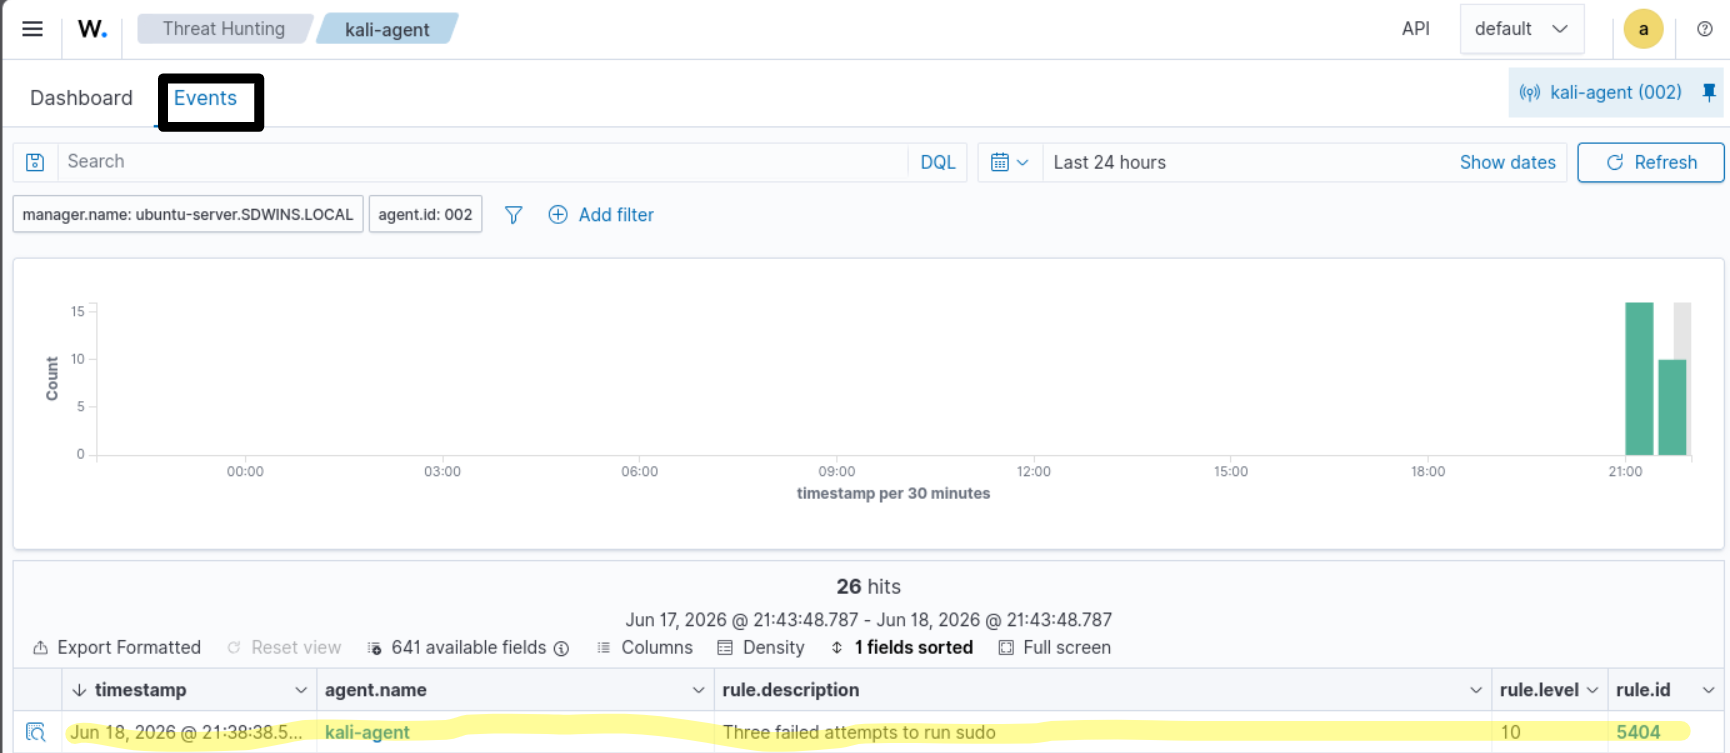 This alert triggered because there is a default ruleset for this. You can see this in your wazuh server's
/var/ossec/ruleset/rules/ directory. This is the directory where all default rules live. For this
particular action(3 failed sudo logins), the rule is defined in /var/ossec/ruleset/rules/0020-syslog_rules.xml
in rule id 5404 with level 10.
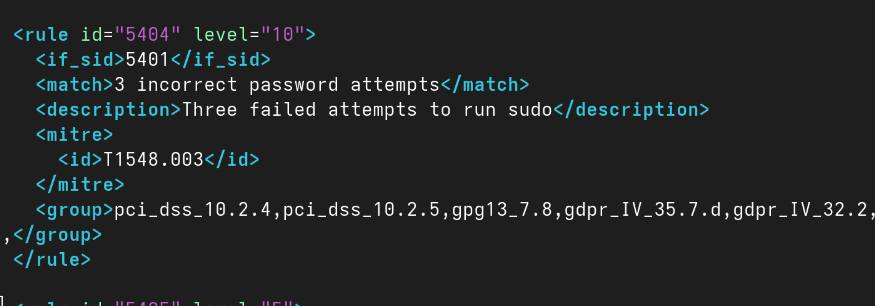 But why is this in syslog rules and not PAM rule? As mentioned earlier both
PAM and sudo log the failure but PAM logs the authentication failure i.e. "password check failed"
sudo logs the overall event i.e "3 incorrect password attempts"
Both messages end up in journald and Wazuh reads both from there.
But the Wazuh rule that fires (syslog ruleset) is typically matching the sudo message,
not the PAM one, since the sudo message is cleaner and more definitive.
But why is this in syslog rules and not PAM rule? As mentioned earlier both
PAM and sudo log the failure but PAM logs the authentication failure i.e. "password check failed"
sudo logs the overall event i.e "3 incorrect password attempts"
Both messages end up in journald and Wazuh reads both from there.
But the Wazuh rule that fires (syslog ruleset) is typically matching the sudo message,
not the PAM one, since the sudo message is cleaner and more definitive.
Windows Agent and Logs
In windows the ossec.conf is present in C:\Program Files (x86)\ossec-agent\ossec.conf.
The Wazuh agent can be configured to monitor Windows Event Logs and application log files using the <localfile> block in the same way as Linux. Unlike Linux, most important Windows logs are stored in the Event Log subsystem rather than as plain text files.
📂 Windows Event Logs
Windows stores its system, security, and application logs as .evtx files under
C:\Windows\System32\winevt\Logs\. These logs are typically monitored through their
Event Log channel names rather than by directly reading the files.
| Event Log Channel | Purpose |
|---|---|
Security |
Contains authentication events, privilege usage, account management, and audit logs. Useful for detecting unauthorized access and brute-force attacks. |
System |
Contains operating system events such as driver failures, service crashes, hardware issues, and system startups or shutdowns. |
Application |
Contains events generated by installed applications and services. |
Microsoft-Windows-PowerShell/Operational |
Records PowerShell command execution and script activity. |
Microsoft-Windows-Sysmon/Operational |
Provides detailed process creation, network connection, registry modification, and file activity logs when Sysmon is installed. |
Microsoft-Windows-Windows Defender/Operational |
Contains malware detection, quarantine, and antivirus activity generated by Microsoft Defender. |
🌐 Application and Service Logs
-
C:\inetpub\logs\LogFiles\
Purpose: Default location for IIS web server logs. Contains records of incoming HTTP requests and server errors. -
C:\ProgramData\
Purpose: Many applications store log files in application-specific directories under this path. -
C:\Program Files\andC:\Program Files (x86)\
Purpose: Some applications maintain their own log directories within their installation folders.
🔍 Viewing Windows Logs
Windows logs can be viewed using the Event Viewer application or through PowerShell.
# List available event log channels
Get-WinEvent -ListLog *

# Read recent Security events
Get-WinEvent -LogName Security

# Export logs to a file
wevtutil epl Security security.evtxSecurity, System, Application,
Microsoft-Windows-PowerShell/Operational, and
Microsoft-Windows-Sysmon/Operational event channels because they provide the most useful information for detecting malicious activity.
⚙️ Example Wazuh <localfile> Configuration for Windows
The Wazuh agent uses the <localfile> block to specify which Windows Event Log channels or log files should be monitored. Some common examples are shown below.
<!-- Monitor Windows Security Events -->
<localfile>
    <location>Security</location>
    <log_format>eventchannel</log_format>
</localfile>

<!-- Monitor System Events -->
<localfile>
    <location>System</location>
    <log_format>eventchannel</log_format>
</localfile>

<!-- Monitor Application Events -->
<localfile>
    <location>Application</location>
    <log_format>eventchannel</log_format>
</localfile>

<!-- Monitor PowerShell Activity -->
<localfile>
    <location>Microsoft-Windows-PowerShell/Operational</location>
    <log_format>eventchannel</log_format>
</localfile>

<!-- Monitor Sysmon Events -->
<localfile>
    <location>Microsoft-Windows-Sysmon/Operational</location>
    <log_format>eventchannel</log_format>
</localfile>
Wazuh can also monitor ordinary text log files generated by applications. For example, to monitor IIS web server logs:
<localfile>
    <location>C:\inetpub\logs\LogFiles\W3SVC1\u_ex*.log</location>
    <log_format>iis</log_format>
</localfile>
Wazuh File Integrity Monitoring (FIM) Explained
File integrity monitoring is a very powerful security process that can be used to disrupt the Cyber Kill Chain by detecting unauthorized and unexpected changes to critical files, configurations, and registry entries. before attackers can fulfill their mission.
But what is the Cyber Kill Chain? The phrase sounds cool doesn't it? I should have introduced this concept a bit
earlier but I prefer to do it here. Cyber Kill Chain is a foundational cybersecurity framework developed by Lockheed Martin that maps out
the sequential phases of a cyberattack. By breaking down the attack lifecycle from the adversary's
perspective, security teams can identify, disrupt, and prevent threats at different stages. It takes inspiration
from the military's kill chain, which is a step by step approach that identifies and stops enemy activity.
The framework breaks down cyberattack into 7 tightly linked phases:
- Reconnaissance: The attacker researches and identifies the target, gathering information on the organization's network, systems, and employees.
- Weaponization: The attacker pairs a malicious payload (like malware) with an exploit designed to take advantage of specific vulnerabilities found during reconnaissance.
- Delivery: The weaponized payload is transmitted to the target environment via methods such as phishing emails, infected USB drives, or malicious websites.
- Exploitation: The malicious code is triggered or executed, allowing the attacker to take advantage of the targeted vulnerability.
- Installation: The attacker installs malware or a backdoor on the compromised system to ensure continuous, long-term access (persistence).
- Command and Control (C2): The compromised system establishes an outbound connection to a server controlled by the attacker, allowing remote control over the target network.
- Actions on Objectives: The attacker achieves their final goal, which may include data exfiltration, ransomware deployment, or destroying network operations.
Using FIM we can neutralize the attack in the most critical stages of the kill chain. During exploitation
and installation, attackers execute malicious code to gain a foothold and establish persistence, often
installing rootkits, Trojans, or custom web shells.
FIM continuously monitors highly targeted operating system directories
(like C:\Windows\System32 or /etc/). The moment a new binary is created or an executable
file is replaced, FIM alerts the Security Operations Center (SOC) immediately.
This stops the attacker from solidifying their hold on the machine.
How FIM works and what kind of files do we monitor?
FIM takes a cryptographic hash (like SHA-256) of files at a known-good baseline state. It then periodically re-hashes those same files and compares the results. If a hash changes, the file was modified, even a single byte difference produces a completely different hash.
The basic workflow
- Baseline creation: An agent scans designated files/directories and records hashes, permissions, ownership, timestamps, and file size into a secure database.
- Scheduled or real-time scanning: Either periodically re-scans and compares, or hooks into the OS kernel (via inotify on Linux, FSEvents on macOS, or the Windows change journal) to get immediate change notifications.
- Alerting: When a deviation is detected, it logs the event and sends an alert with details: what changed, when, and sometimes which process made the change.
- Review and response: A security team reviews whether the change was authorized (a software update, config change) or suspicious (malware, intrusion).
So what files to monitor? That is a important question. Not all files needs monitoring and its a waste of time monitoring each and every file in the system. Let's see what to monitor and what you dont.
What Files Feed Monitoring
System Binaries & Executables
/bin,/sbin,/usr/binon Linux — core OS commands likels,sudo,ssh- DLLs and
.exefiles on Windows (System32) - If malware replaces these, it's serious
/etc/passwd,/etc/shadow,/etc/sudoers— user accounts and privileges- SSH configs (
sshd_config,authorized_keys) - Firewall rules, cron jobs
- App configs (nginx, Apache, database)
- Bootloader files
- Kernel modules (
/lib/modules) - Tampered boot components can compromise the entire system before the OS even loads
- PHP, JS, HTML files on a web server
- A common attack pattern is dropping a web shell (a small backdoor script) into a web directory; FIM catches this
- Certificate and key files (
.pem,.key) /etc/hosts, DNS hijacking via this file is a classic attack- PAM modules (authentication stack)
- These are monitored differently, watch for deletions or truncations rather than modifications
- Attackers often wipe logs to cover tracks
What Files You Generally Don't Monitor
- Frequently changing files (databases, mail spools, temp files) — they'd generate constant noise
- Log files that grow normally
- User home directories in most cases because it's too much churn
The art of FIM is narrowing the scope to files that should almost never change in normal operation, so that any alert is genuinely meaningful rather than noise.
Configure the FIM module
Till now this article has been linux heavy so for this part I will be using Windows agent to show you how to configure the FIM module. Although tech people like to bash on Windows and almost all of them see Linux as the superior OS, we should accept the fact that there are a lot of Windows machine out there. But always remember, the concepts remain the same no matter what OS you are on.
We need to configure what files or directory to monitor in the Wazuh agent conifg file. In Linux
it is /var/ossec/etc/ossec.conf, which we have seen already. In Windows the same file
lives in C:\Program Files (x86)\ossec-agent\ossec.conf
Add the file or directory you want to monitor in with the <directories> option within the
<syscheck>
    <directories>FILEPATH_OF_MONITORED_FILE</directories>
    <directories>FILEPATH_OF_MONITORED_DIRECTORY</directories>
</syscheck>Track C:\Windows\System32\drivers\etc\hosts -> this file maps hostnames to IP
addresses. Attackers commonly modify it to redirect legitimate domains
(e.g. your bank's website) to malicious servers. This is known as 'DNS hijacking/DNS spoofing/Host file poisoning'.
This hosts file should almost never change in normal operation, making it an ideal FIM target.
<syscheck>
    <directories>C:\Windows\System32\drivers\etc\hosts</directories>
</syscheck>Run command notepad C:\Program Files (x86)\ossec-agent\ossec.conf in privileged powershell
to open the ossec.conf file.
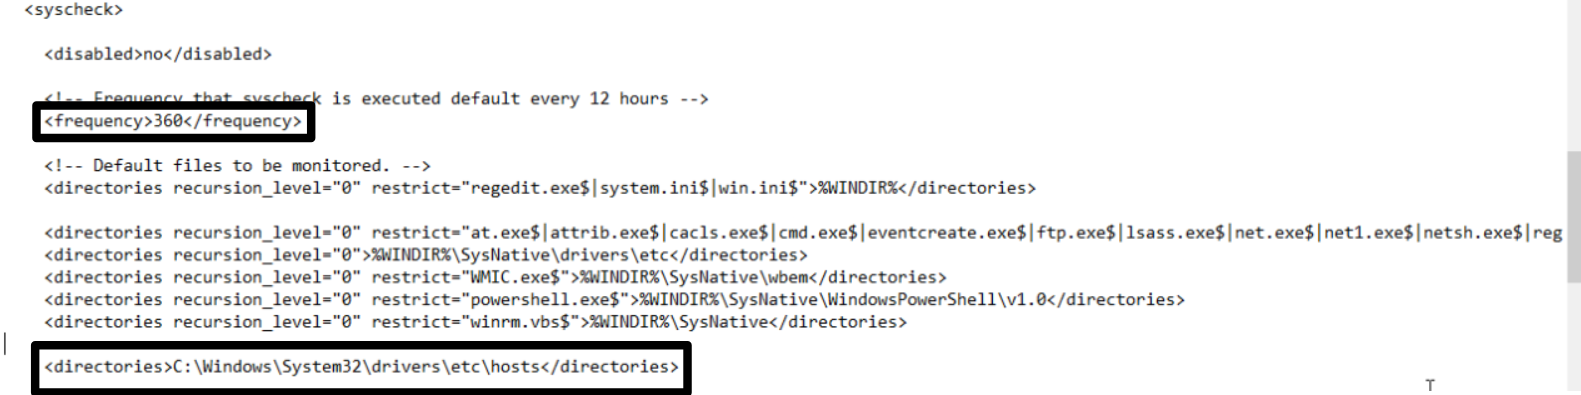 I have also changed the frequency to 360 seconds. This means File Integrity check will run every 360 seconds.
By default this value is 43200(12 hrs).
I have also changed the frequency to 360 seconds. This means File Integrity check will run every 360 seconds.
By default this value is 43200(12 hrs).
Now restart the wazuh agent by running the command:
Restart-Service -Name WazuhSvc
Now let's change the hosts file in Windows client and see if an alert is triggered or not.
In a priviledged powershell run notepad C:\Windows\System32\drivers\etc\hosts to open the hosts file.
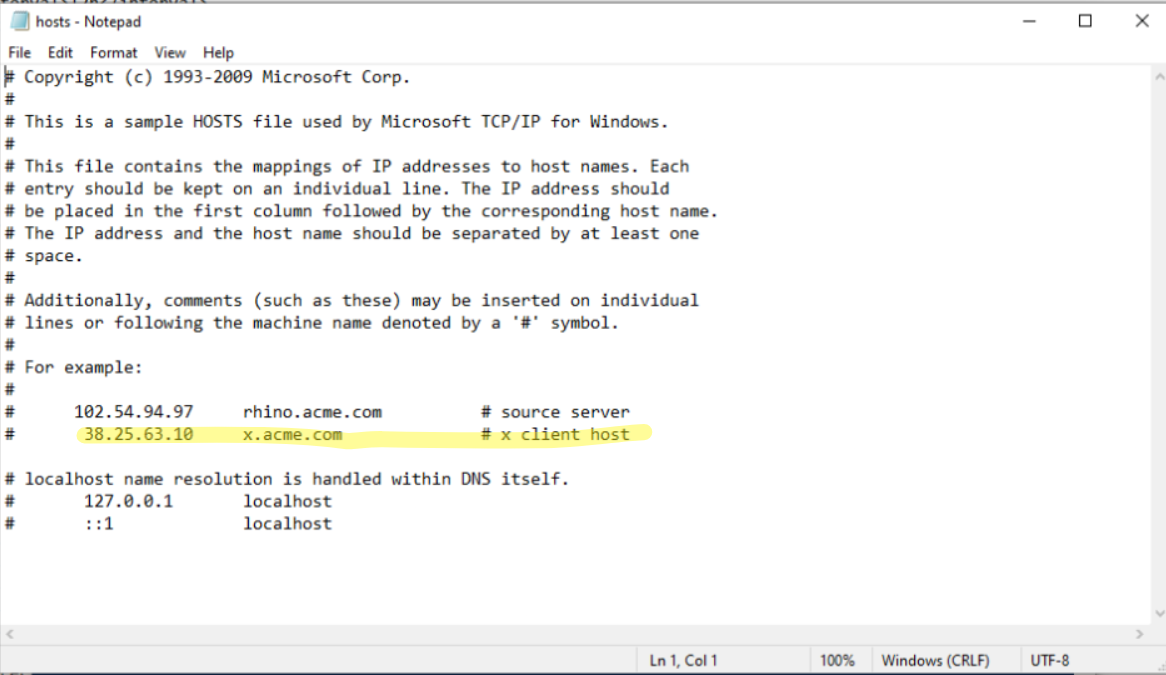 This is the original hosts file in my windows machine where the address 38.25.36.10 is associated with x.acme.com(although this
is just an example and actually commented out it does not matter, we just want to monitor the integrity of the file).
This is the original hosts file in my windows machine where the address 38.25.36.10 is associated with x.acme.com(although this
is just an example and actually commented out it does not matter, we just want to monitor the integrity of the file).
Now I will make a small change and change the Ip address to 38.25.36.1.
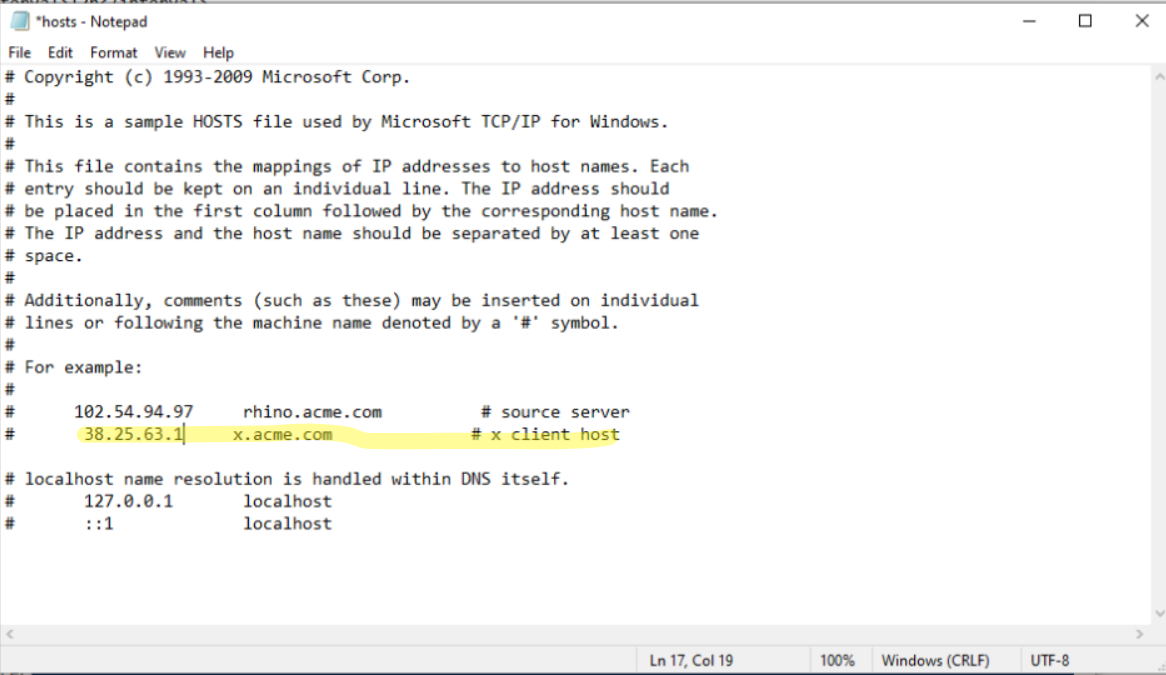 We have set the frequency to 360 ie 5 mins. Syscheck needs 2 scans to detect a change. First scan builds the baseline
and second scan compares the current state to baseline. The first scan happens immediately after agent restart. Every subsequent
scans then take place after 5 mins. So we need to wait about 5 minutes to see the alert. After some time, the alert will
appear in the wazuh dashboard. To see the alert go to your agent dashboard then click File Integrity Monitoring then click Events.
We have set the frequency to 360 ie 5 mins. Syscheck needs 2 scans to detect a change. First scan builds the baseline
and second scan compares the current state to baseline. The first scan happens immediately after agent restart. Every subsequent
scans then take place after 5 mins. So we need to wait about 5 minutes to see the alert. After some time, the alert will
appear in the wazuh dashboard. To see the alert go to your agent dashboard then click File Integrity Monitoring then click Events.
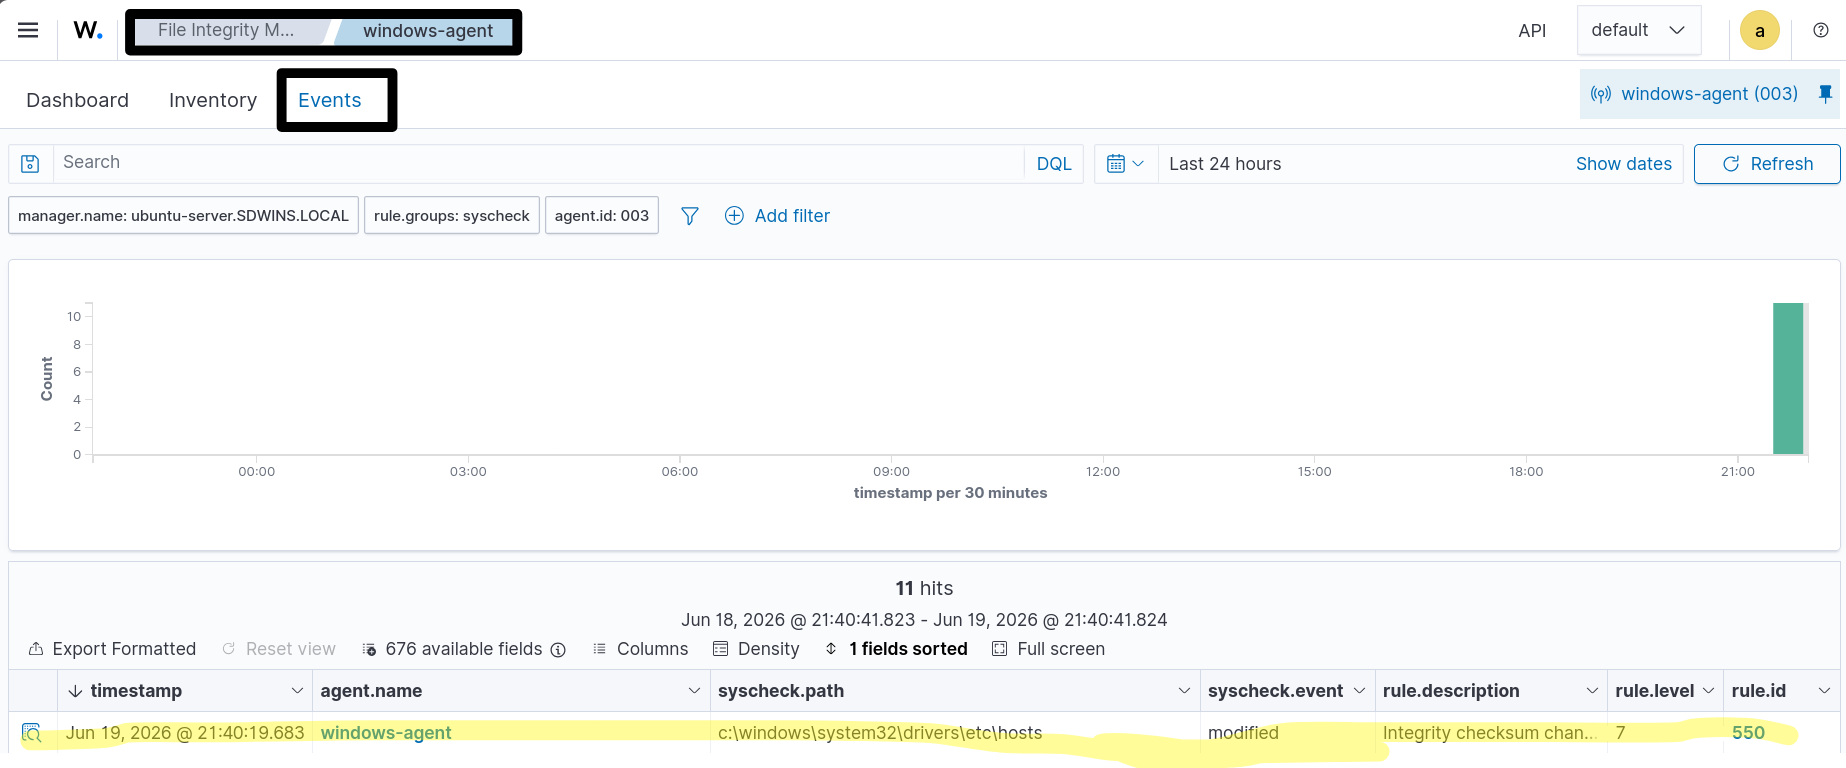 The alert appears in the log with alert level 7.
How Wazuh Vulnerability Detection Works
We saw that wazuh has a Vulnerability Module here. But how does this work? Let's find out.
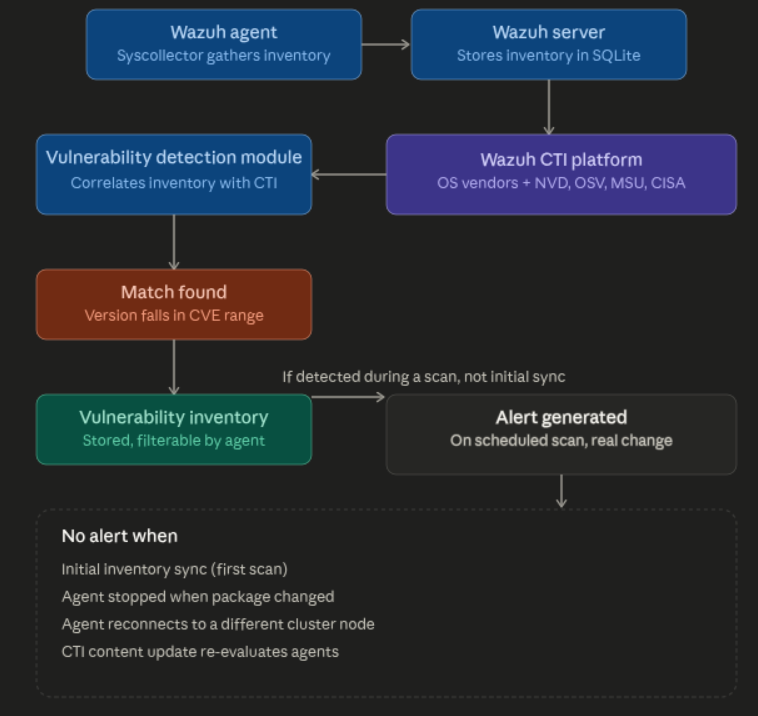 The Wazuh Agent has a module called Syscollector. This module is responsible for collecting system inventory data.
The inventory data includes information about the Operating system(version. build, patch level) and Installed packages/application(Names and versions).
The collected data is periodically sent to the Wazuh server and stored in a local SQLite database. Each agent has its
separate inventory, which is continuously updated to reflect the changes on the monitored endpoint.
The Wazuh Agent has a module called Syscollector. This module is responsible for collecting system inventory data.
The inventory data includes information about the Operating system(version. build, patch level) and Installed packages/application(Names and versions).
The collected data is periodically sent to the Wazuh server and stored in a local SQLite database. Each agent has its
separate inventory, which is continuously updated to reflect the changes on the monitored endpoint.
One added dimension for Windows:
For Microsoft Windows System and certain Microsoft products, the module also includes the hotfixes options in
Syscollecctor Configuration. This means for Windows, inventory effectively extends to include applied hotfixes, not just installed
package versions.
The Wazuh Server has the Vulnerability Detection module. This module analyzes the inventory by correlating it with vulnerability information from the Wazuh Cyber Threat Intelligence(CTI) platform. A package is marked as vulnerable when its installed version falls within the affected range of a CVE. Matches generate alerts and get stored in a queryable, agent-filterable vulnerability inventory.
The CTI Platform (this replaces the old per-vendor feed model)
The Wazuh CTI platform aggregates vulnerability data from operating system vendors and public vulnerability databases into one unified repository.
Sources:
Operating system vendors:
- AlmaLinux
- Amazon Linux
- Arch Linux
- Ubuntu (Canonical)
- Debian
- Fedora
- Oracle Linux
- RHEL
- Rocky Linux
- SUSE Linux Enterprise
Security databases:
- Microsoft Security Updates (MSU)
- National Vulnerability Database (NVD)
- Open Source Vulnerabilities (OSV)
- Cybersecurity and Infrastructure Security Agency (CISA)
The VDP (Vulnerability Detector Provider) : the normalization layer
This is the piece most people miss. The VDP organizes vulnerability data from multiple vendors into a standardized format, producing consistent intelligence that let's the module identify vulnerabilities across Windows, CentOS, RHEL, Ubuntu, Debian, Amazon Linux, Arch Linux, SUSE, and macOS.
It does this in three steps:
- Content migration: Fetches raw vendor data and normalizes it into the CVE JSON v5 format.
- Data sanitization: Fixes inconsistencies such as version mismatches and typographical errors and fills missing fields.
- Content merging: Combines vendor-specific content with internally maintained intelligence (product name mappings, translations, and OS base rules) to produce one unique document per CVE.
The Wazuh manager retrieves this intelligence by querying the CTI API or an offline local repository and compares newly fetched content against previously stored data to detect updates, making the process incremental rather than requiring a full re-download each time.
Alert Generation
Now this is what you need to understand to solve problems that may frustate you. This is the part with real operational gotchas. This is the most practically important section if you're trying to understand why you're not seeing an alert you expected.
OS-level alerts
- These are never generated during the initial inventory scan. When an Wazuh Agent first syncs with the Wazuh Manager, OS version or patch changes are not treated as new events.
- Alerts only fire on subsequent scans when an actual change inm OS version or patch state is detected.
Package-level alerts
- These only fire when a vulnerability is added to or removed from inventory due to a package installation or removal.
- The event must be captured during a scheduled Syscollector scan.
- If packages change while the Wazuh agent is stopped, no alert is generated.
- If the change is only detected after the Wazuh agent restarts, no alert is generated.
Two more easy-to-miss cases:
- Clustered managers: If an agent reconnects to a different node, it re-syncs its inventory with the new node, but that initial sync does not generate alerts even if changes exist.
- CTI content updates: When CVE definitions, translations, or mapping rules are updated server-side, every agent gets re-evaluated against the new content, but that re-evaluation itself does not generate alerts.
In short, alerts require a detected delta during a live, scheduled scan—not just the existence of a vulnerability in the data. This explains a common confusion: a freshly enrolled agent with 200 known CVEs will not generate 200 alerts. Instead, it silently populates the inventory, and alerts only begin appearing when changes are detected in future scans.
Viewing the data
In the dashboard, vulnerability information is available under:
Threat Intelligence → Vulnerability Detection
- Dashboard tab — displays severity distributions, vulnerability scores, and asset trends.
- Inventory tab — displays the complete per-CVE inventory and provides links to the Wazuh CTI site for detailed vulnerability information.
The Vulnerability Detection module is enabled by default on the Wazuh manager.
The default vulnerability detection setting is in the following block in the Wazuh manager configuaration file at
/var/ossec/etc/ossec.conf
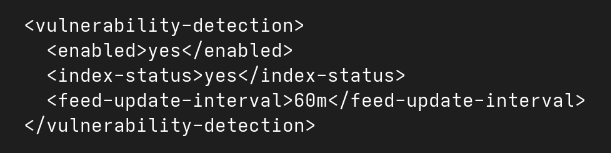
I basically have tried to narrow down the Vulnerability detection of Wazuh in this section of the article. But I highly encourage you to check out the official docs here for more up to date and detailed information.
Active Response
PLACEHOLDER — active response
There seems to be a confusion that Wazuh(SIEM in general) is just a passive tool where you see logs and alerts and
take actions manually. While this was true traditionally, modern SIEM platform are capable of automatically responding to
threats as well. Complex responses are typically handled via
Security Orchestration, Automation and Response(SOAR) platform. Lern more about SOAR here.
SOAR is a different platform that needs to be connected in SIEM platforms, but there is a built in module in wazuh called Active Response
that helps automate response actions based on specific triggers. This is very useful and often overlooked module in Wazuh. It massively helps reduce alert fatigue.
How does Wazuh Active Response work?
The Wazuh Active Response module is configured with scripts. Wazuh provides some out-of-the scrips for basic triggers like blocking malicious network access and deleting malicious files on monitored endpoints, but we can also write out own scripts in python, bash etc)(check out my article on bash scripting here). The Wazuh Active Response module executes these scripts on monitored endpoints when an alert of a specific rule ID, level, or rule group triggers. You can have more than one script file for a trigger.
The Wazuh Active Response mechanism
We have already seen how logs travel from Wazuh Agent to the Wazuh Manager, how logs are decoded and a rule is triggered generating an alert. For active response, the followings further steps take place:
- The manager checks its configurations (ossec.conf) for an explicit <active-response> block tied to that rule ID, group, or severity level.
- If a match exists, the manager looks up the corresponding <command> block to identify the exact filename of the remediation script (e.g., firewall-drop.sh or a custom script file).
- The manager sends an encrypted command string along with this JSON payload back down to the target agent(s) through the established agent-manager communication channel. This JSON payload contains things like full generated alert including target IP address, source usernames, file hashes and rule severities.
- The Wazuh agent receives the payload and reads the target executable from its local directory:
- Linux:
/var/ossec/active-response/bin/ - Windows:
C:\Program Files (x86)\ossec-agent\active-response\bin\
- Linux:
- The agent runs the script as a subprocess, passing the JSON alert metadata directly into the script's standard input (stdin).
- The active response script parses the stdin payload, extracts the target indicators (like an IP address), and runs local system utilities to neutralize the threat. Examples: Blocing an IP via iptables, disabling a compromised user account via net user, or deleting malware.
- The script outputs its execution status to the local agent log (active-responses.log) for auditing.
Practical Active Response Configuration And Response Trigger
Let's setup a simple Lab to see the Active Response module in action. First we will trigger out-of-the-box active response scripts provided by Wazuh(see the full list of provided scripts here.) Later we will write a custom script
The scenario is, I want to block IP of an attacker using the firewall-drop active response after multiple
failed SSH login attempts. I will use my Kali Linux as the SSH server and I will use my Fedora host to perform multiple failed login attempts.
The sshd service is active in my Kali machine and the ip of my Kali machine is 192.168.122.76.
- Configure the <command> block in the Wazuh server
/var/ossec/etc/ossec.conf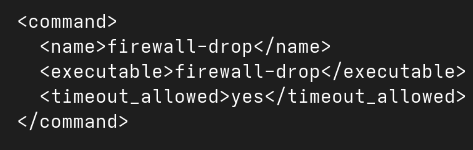 Here,
Here,
- <name>: Sets a name for the command. In this case, firewall-drop.
- <executable>: Specifies the active response script or executable that must run upon a trigger. You don't need to specify the file name extension unless you have multiple scripts sharing the same name. In this case, it is the firewall-drop executable.
- <timeout_allowed>: Allows a timeout after a period of time. Setting this value to yes reverts the action after a period of time.
- Now add an <active-response> block within the <ossec_config> tag in the same
Wazuh server
/var/ossec/etc/ossec.conffile.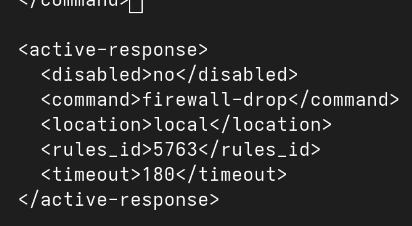
<command>: Specifies the command to configure. This is the command name defined in the previous step.<location>: Specifies where the command must execute. The options are:local: It runs the script on the monitored endpoint that generated the alert.server: It runs the script on the Wazuh server.defined-agent: It runs the script on a predefined agent. Use the<agent_id>tag to specify the ID of the Wazuh agent that must run the script regardless of where the event occurred. For example:<ossec_config> <active-response> <disabled>no</disabled> <command>host-deny</command> <location>defined-agent</location> <agent_id>001</agent_id> <level>10</level> <timeout>180</timeout> </active-response> </ossec_config>all: Every Wazuh agent in the environment must run the script. Use this option with caution. Incorrect configuration can cause problems in your environment.
<timeout>: Specifies how long the active response action is effective, in seconds.
Source: Official Wazuh Docs
No configuration is required for agent while using out of the box script.
The script we are trying to run is located in
/var/ossec/active-response/bin by default.

But what did we actually configure?
After the agent sends the log and a rule is triggered in the manager, the manager checks
the <active-response> block of the config file. It understands that the agent in which ssh brute force attack has been attempted(Given by rule id 5763)
needs to execute the firewall-drop script. Then, after 180 seconds it needs to revert the changes it made after executing the script.
The firewall-drop is a script located in the monitored endpoint's /var/ossec/active-response/bin/firewall-drop that blocks a specific IP address.
But how does it know which IP address to block? This information should be passed as argument to the script. This is done by the manager. But how?
After a match in the active-response , the manager looks up the corresponding <command> block to identify the exact
filename of the remediation script (e.g., firewall-drop or some custom script as well). It then makes a JSON payload which looks like:
{
  "version": 1,
  "origin": {
    "name": "node01",
    "module": "wazuh-analysisd"
  },
  "command": "add",
  "parameters": {
    "extra_args": [],
    "alert": {
      "id": "1719999999.123456",
      "timestamp": "2026-06-22T10:15:30.123+0000",
      "rule": {
        "level": 10,
        "description": "sshd: Multiple authentication failures.",
        "id": "5712",
        "mail": false,
        "groups": ["syslog", "sshd", "authentication_failures"],
        "firedtimes": 8
      },
      "agent": {
        "id": "003",
        "name": "web-server-01",
        "ip": "10.0.0.15"
      },
      "manager": {
        "name": "node01"
      },
      "data": {
        "srcip": "192.168.1.100",
        "srcuser": "admin",
        "dstuser": "root",
        "protocol": "ssh"
      },
      "decoder": {
        "name": "sshd"
      },
      "location": "/var/log/secure"
    }
  }
}
Field-by-field for this case
| Field | Description | Example value |
|---|---|---|
version |
Payload format version | 1 |
origin.name |
Manager/node that sent the command | node01 |
origin.module |
Module that triggered it | wazuh-analysisd |
command |
add blocks the IP now; delete is sent automatically later to unblock it once the AR timeout expires |
add |
parameters.extra_args |
Extra CLI args from the <arguments> block in ossec.conf, if configured |
[] |
parameters.alert.rule.id / level |
Which rule fired and its severity. This must meet the <rules_id> / <level> filter set in the active-response config |
5763 / 10 |
parameters.alert.data.srcip |
This is the key field firewall-drop.sh/.cmd actually reads — it's the IP that gets blocked |
192.168.1.100 |
parameters.alert.agent.id/name/ip |
The agent that generated the alert (and where the script runs, unless AR is set to manager-side execution) | 003 / web-server-01 |
How firewall-drop uses it
The script (firewall-drop.sh on Linux, firewall-drop.cmd on Windows) reads stdin, parses this JSON, checks command:
- add → extracts
parameters.alert.data.srcipand inserts a DROP rule (iptables/nftables/netsh) for that IP, then logs it toactive-responses.log. - delete → removes that same rule for that IP.
If srcip isn't present in the alert's data object, the active response won't have an IP to block and will typically fail or no-op, this is why firewall-drop is only mapped to rules that reliably populate srcip (e.g., SSH brute force, port scan rules).
So now I will attack my Kali Linux agent using a open source brute force tool called hydra. I am going to perfrom a ssh brute force
on my Kali machine which has IP address 192.168.122.76 using my fedora host. Before attacking let me ping my Kali
machine from fedora.
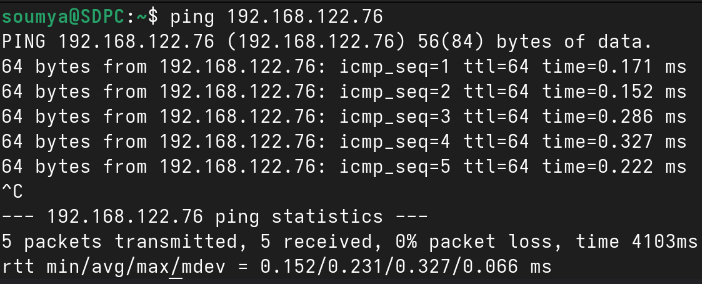 The ping is successful which means my Fedora host can reach kali. Now I will attack using the command:
sudo hydra -t 4 -l root -P password.txt 192.168.122.76 ssh
Here,
- root->username
- password.txt->File consisting all the passwords to try
- 192.168.122.76->Ip address of the target machine
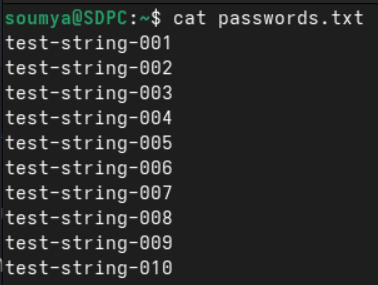
You need to create this file. I have created a simple file with 10 passwords to try. How hydra does brute force is simple, it connects to ssh at the target IP address using username root and tries all the passwords written in the paswords.txt file.
 After hydra complets the attack let's check the wazuh dashboard.
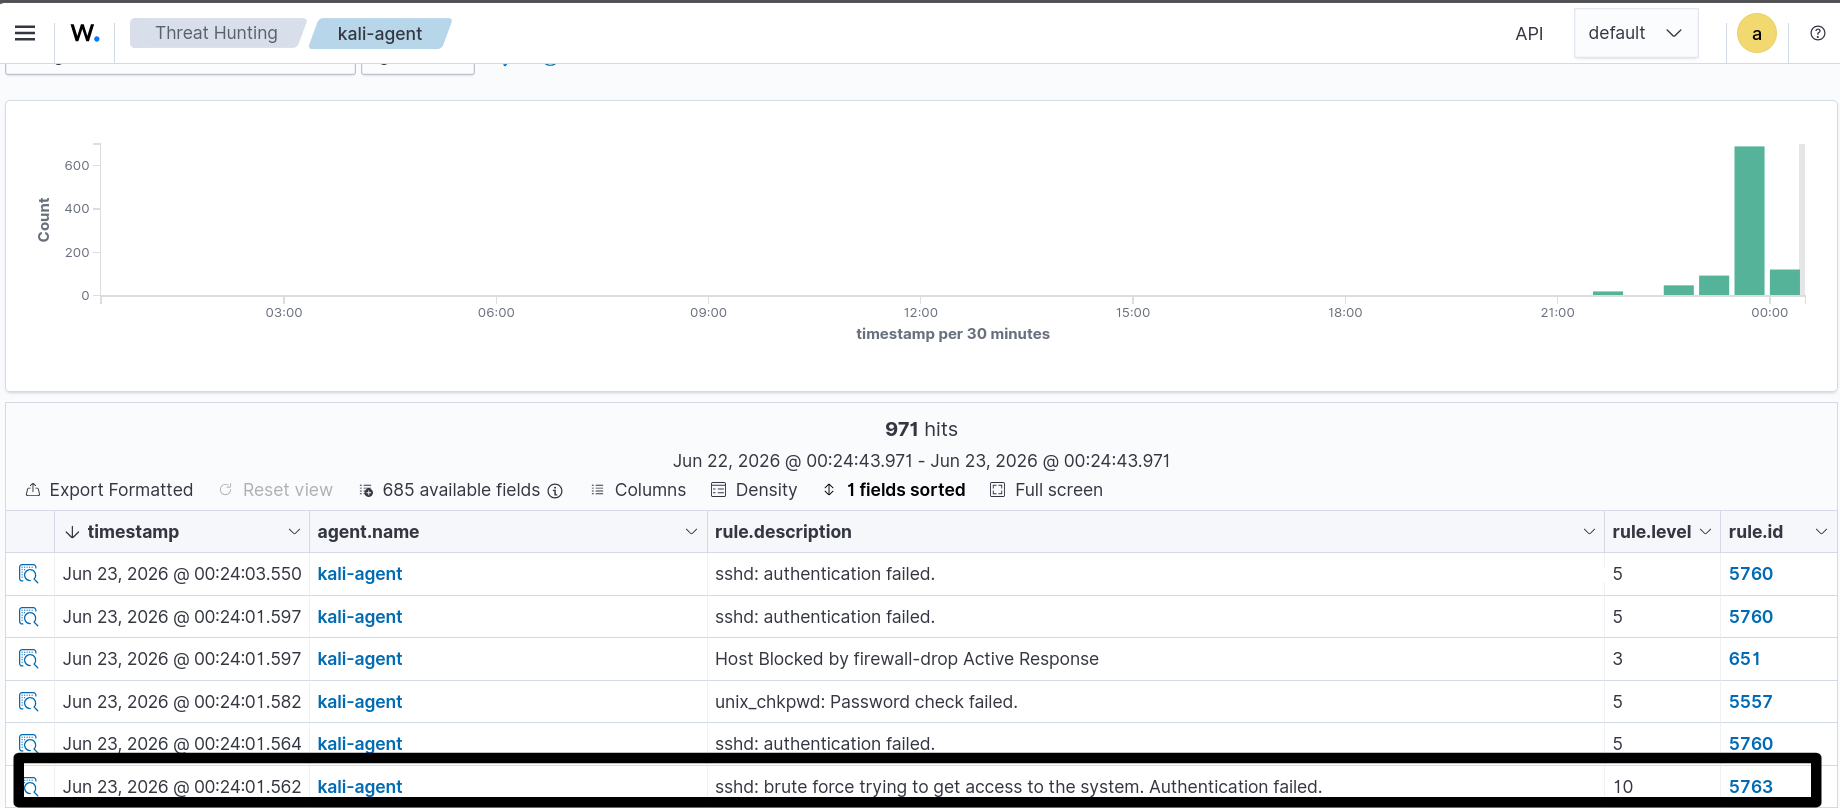
As we can see rule 5763(ssh brute force attack) is triggered and alert is shown in the dashboard. Now the manager checks the
<active-response> block of its config file and sees that it needs to run a script named firewall-drop.
It then checks the <command> block to see further information(like name of the actual executable and nature; stateless or stateful)
about frewall-drop.
Then the Wazuh Manager sends the JSON payload mentioned above to the Wazuh client into the script's standard input. The script then
runs using the defined parameters in the payload, blocking the IP address of the attacker. After the attack if I try to
ping the Kali machine again withing 180 seconds(this is the timeout we configured), the ping will fail.

This shows that active reponse worked. Which means the script added a DROP rule for my fedora IP to iptables.
Also we can see the iptable for DROP rule using
sudo iptables -L -n | grep DROP

This shows that Kali added drop rules to the Fedora IP. The IP of Fedora for Kali is 192.168.122.1for Kali because
Kali is the VM hosted by Fedora so Fedora is the gateway for Kali, this is how VMs use network.
Now after 180 seconds the Wazuh Manager will again send the JSON payload but this time the command field in the
JSON payload will be 'delete' instead of add so the script will romove the DROP rule for that IP, effectively reverting the action.
Now if I ping again, it will be successful again.
And the DROP rule will be removed.

No output means there is no DROP rule in the iptable.
We can also write custom responses for actions for which Wazuh does not provide out of the box scripts for. We will see how to set this up with an example in the next section; Writing Custom Rules
Writing Custom Rules
We have seen the out-of-the-box detection rules provided by Wazuh that are located in
/var/ossec/ruleset/rules/. Custom or user-defined rules, by contrast,
live in /var/ossec/etc/rules/local_rules.xml.
To see how custom rule creation works in practice, let's walk through an example scenario: detecting a DLL hijacking attack. In this technique, an attacker tricks a legitimate, trusted program into loading and executing a malicious DLL instead of the genuine one it expects. DLLs (Dynamic Link Libraries) are shared code modules on Windows systems, used by multiple programs simultaneously so that common functionality doesn't need to be reimplemented in every application.
How Windows Searches for DLLs
DLL hijacking is possible because of how Windows locates a DLL when a program requests one without specifying a full, absolute path. When an application calls for a DLL by name only, Windows searches a defined sequence of locations, in order, and loads the first matching file it finds, regardless of whether that file is the legitimate one. If Safe DLL Search Mode is enabled (the Windows default), the order is:
- The directory from which the application loaded
- The system directory (
C:\Windows\System32) - The 16-bit system directory (
C:\Windows\System) - The Windows directory (
C:\Windows) - The current working directory
- Directories listed in the
PATHenvironment variable
If Safe DLL Search Mode is disabled, the current working directory moves up to second in the search order, immediately after the application's own directory — which significantly widens the attack surface, since many more locations become viable places to plant a malicious DLL.
An attacker who can write a file to any directory that gets searched before the legitimate DLL's true location can drop a specially crafted, identically named malicious DLL there. When the trusted application runs, Windows finds and loads the attacker's file first, executing the malicious code with whatever privileges the legitimate application holds. This is why detection rules often focus on unexpected DLL loads from non-standard paths, or file-creation events involving system DLL names in unusual directories. In MITRE ATT&CK terms, DLL hijacking maps to technique T1574.001 under the Execution and Stealth tactics simultaneously.(If you don't understand the last line about MITRE ATT&CK, I will remind you once again to study and understand the MITRE framework)
Now, to detect whether a system is under a DLL hijacking attack, we need to know the location from which a DLL was loaded into memory. This is a critical detail and unfortunately, it simply cannot be obtained from Windows' default event logs.
By default, Windows collects logs classified into five categories:
- Application: Logs events related to software and installed programs (e.g., app crashes).
- Security: Records audit events like successful or failed login attempts and permission changes.
- System: Tracks events related to Windows OS components, such as driver failures or service startup issues.
- Setup: Records events related to application and system updates.
- Forwarded Events: Stores events sent from other computers on a network (via Windows Event Forwarding).
These built-in logs are useful, but relatively shallow. They tell us what happened at a surface level (a program crashed, a login failed) without capturing the finer-grained, technical details of how it happened. To detect something as specific as an unusual DLL load, we need deeper visibility. This is where Sysmon (System Monitor) comes in.
Why Sysmon
Sysmon is a free Windows Sysinternals tool that installs as a system service and device driver, and logs detailed information about system activity like process creation, network connections, file changes, and, importantly for us, image (DLL) loads, directly into the Windows Event Log. Unlike the default logs, Sysmon captures the low-level operational detail needed for real threat detection: full command lines, parent-child process relationships, file hashes, and the exact path a loaded module was read from.
Each type of activity Sysmon records is assigned a specific Event ID. Some of the most commonly used ones include:
- Event ID 1 — Process creation
- Event ID 3 — Network connection
- Event ID 7 — Image loaded (i.e., a DLL or executable module loaded into a process)
- Event ID 11 — File created
- Event ID 13 — Registry value set
Sysmon is a broad and deep topic in its own right, and a full treatment of it is outside the scope of this article. For our purposes, the key takeaway is this: to catch DLL hijacking, we need to know the exact filesystem location a DLL was loaded from, so we can raise an alert when a DLL is loaded from an unusual or unexpected path. Windows' default logs cannot give us this. Sysmon Event ID 7 (Image Loaded) can — it records the full path of every DLL loaded by every process, which is exactly the visibility we need to build our detection rule.
Installing Sysmon and Configuration
I am sure the official Sysmon documentation are way more helpful than whatever I write here for installing sysmon. So I am just going to summarize the essential steps from the official site
- Download Sysmon from the official Microsoft Sysinternals page and extract the archive.
-
The official site also provides a sample "simple configuration" XML file. Save
this as a config file, for example,
C:\Windows\config.xml(create the config.xml usingnotepad C:\Windows\config.xml) and paste the contents of that sample configuration into it. (This config file tells Sysmon which events to log and which to filter out; without one, Sysmon logs everything by default, which can get noisy fast.) -
Open a command prompt as Administrator in the folder where you extracted
Sysmon, and run:
sysmon -accepteula -i c:\windows\config.xml
(The-accepteulaflag suppresses the EULA prompt so the command can run non-interactively, and-iinstalls Sysmon as a service using the specified configuration file.)
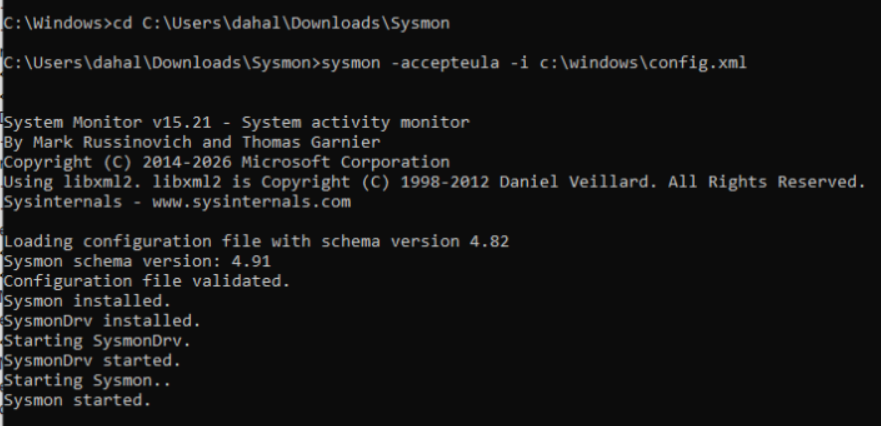
Once installed, Sysmon runs continuously in the background as a Windows service, and
its events will start appearing under
Applications and Services Logs → Microsoft → Windows → Sysmon → Operational
in Event Viewer (to open Event Viewer, type eventvwr.msc into Run —
Windows key + R), which is exactly where Wazuh's agent will pick them up from.
The simple configuration we copied from the official site, however, does not capture
the log we actually need. Event ID 7 (Image/DLL Load) isn't enabled at all.
Looking through that config's <EventFiltering> block, it only configures:
- DriverLoad (Event ID 6): driver loading, excluding Microsoft/Windows-signed ones.
- ProcessTerminate (Event ID 5): explicitly set to log nothing.
- NetworkConnect (Event ID 3): only for ports 443/80, excluding Internet Explorer.
There's no <ImageLoad> section anywhere — and that's the tag that
controls Event ID 7 logging. Let's add it. We could add something like this to the
<EventFiltering> block:
<ImageLoad onmatch="exclude">
            <Signature condition="contains">Microsoft</Signature>
</ImageLoad>
Here, onmatch="exclude" means: log everything except what
matches — i.e., log all image loads except those signed by Microsoft. While this
works, it can be extremely noisy. So instead we'll take a simpler approach: track
only events where a DLL is loaded from an unprotected Windows folder. This
isn't completely noise-free either, but it's a clearer example for understanding
what we're trying to detect. Here's the config for that:
<EventFiltering>
            <!-- existing rules... -->

            <!-- Log DLL loads only if they are NOT from protected/trusted Windows directories -->
            <ImageLoad onmatch="exclude">
              <ImageLoaded condition="begin with">C:\Windows\System32\</ImageLoaded>
              <ImageLoaded condition="begin with">C:\Windows\SysWOW64\</ImageLoaded>
              <ImageLoaded condition="begin with">C:\Windows\WinSxS\</ImageLoaded>
              <ImageLoaded condition="begin with">C:\Program Files\</ImageLoaded>
              <ImageLoaded condition="begin with">C:\Program Files (x86)\</ImageLoaded>
            </ImageLoad>
</EventFiltering>
This is how my config.xml looks:
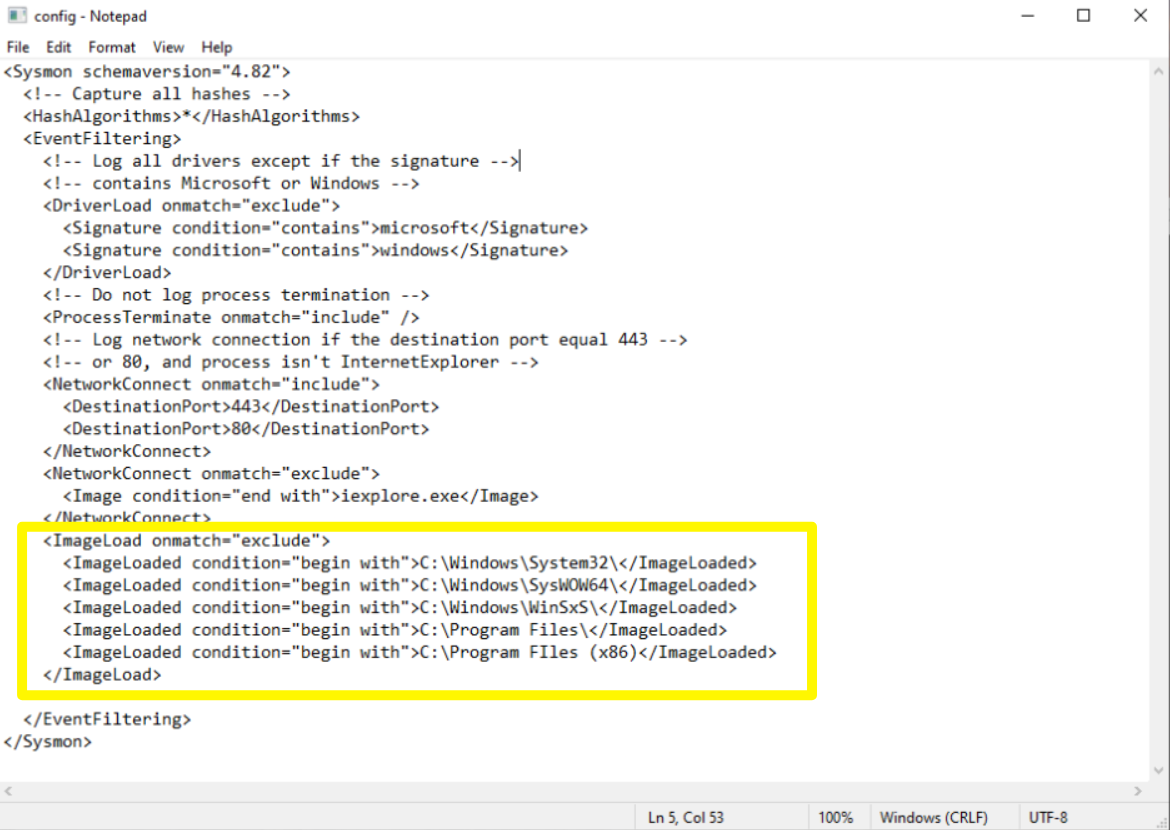 After updating the config file run the following command in cmd from the path where you installed sysmon:
sysmon.exe -c C:\Windows\config.xml
This needs to be done every time the config is changed.
How this works:
onmatch="exclude"means: log every DLL load except those matching the rules below.- Each
<ImageLoaded condition="begin with">rule matches DLLs loaded from that specific trusted path. -
Net effect: Sysmon logs an Event ID 7 only when a DLL is loaded from somewhere
outside these protected folders — e.g.,
C:\Users\<user>\AppData\...,C:\Temp\,C:\Users\Public\, a removable drive, or any other non-standard location. Exactly the "unusual location" signal we're after.
A few things worth knowing before relying on this filter alone:
-
This detects the precondition, not the hijack itself. A DLL loading from
AppDataisn't automatically malicious. Plenty of legitimate software (Chrome's updater, Slack, Teams, Dropbox, etc.) loads its own DLLs fromAppData\Local. This Sysmon config just gives us the raw signal; the logic to actually distinguish "legitimate app loading its own DLL" from "trusted binary hijacked into loading a malicious DLL" has to live in the Wazuh rule itself. -
Program Files and WinSxS deserve a second look later. A compromised or
side-loaded third-party app under
Program Filescould still hijack another app's DLL from within that same directory, so treating everything underProgram Filesas automatically "safe" is a simplification. It's a reasonable starting filter, but worth tightening in a production deployment.
Triggering an Image Loaded Event
To check if sysmon is logging an event of DLL loading from 'unprotected' location, I will create a simple dll file
in C:\Users\dahal and run it from there.
To create the dll I downloaded Visual Studio with 'Desktop Development with C++'.
Then create a C file named test.c with the following code
// test.c
#include <windows.h>

BOOL WINAPI DllMain(HINSTANCE hinstDLL, DWORD fdwReason, LPVOID lpvReserved) {
    return TRUE;
}

void CALLBACK MyEntry(HWND hwnd, HINSTANCE hinst, LPSTR lpszCmdLine, int nCmdShow) {
    // Does nothing — just needs to load and be callable cleanly
    return;
}
A simple LLM with help you understand this code (which you don't really need to, just know that
MyEntry() is a function that other programs can call after loading the DLL.)
After this create a file named test.def with the following code:
LIBRARY test
EXPORTS
    MyEntry
This file tells the linker to add the function MyEntry to the DLL's export table(a data structure that
defines which functions are callable by other programs.)
Now open 'Developers Command Prompt' from visual studio. To do this open Visual Studio->click on 'Tools' in the top bar->
Hover over 'Command Line'-> Click 'Developer Command Prompt'.
Then navigate to the location you have test.c in and run:
cl /LD test.c /link /DEF:test.def
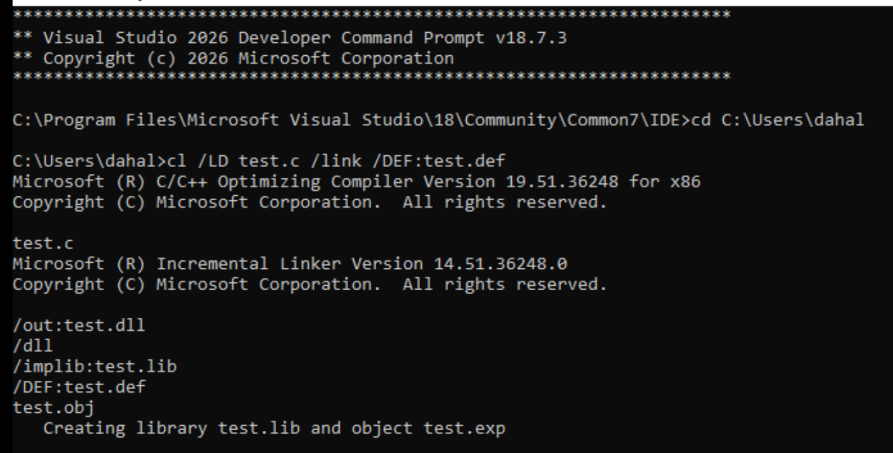
This will produce test.dll with some other files as well.
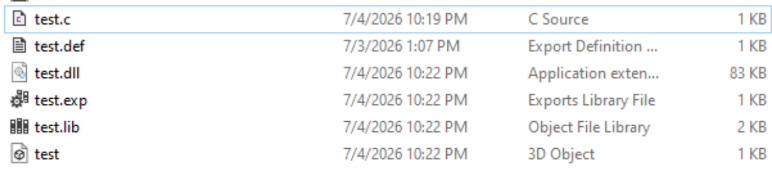
Running the dll and observing the log
Run the dll using the command:
rundll32.exe test.dll,MyEntry
Now go to sysmon Operational logs (Applications and Services Logs → Microsoft → Windows → Sysmon → Operational
in Event Viewer (to open Event Viewer, type eventvwr.msc into Run —
Windows key + R))
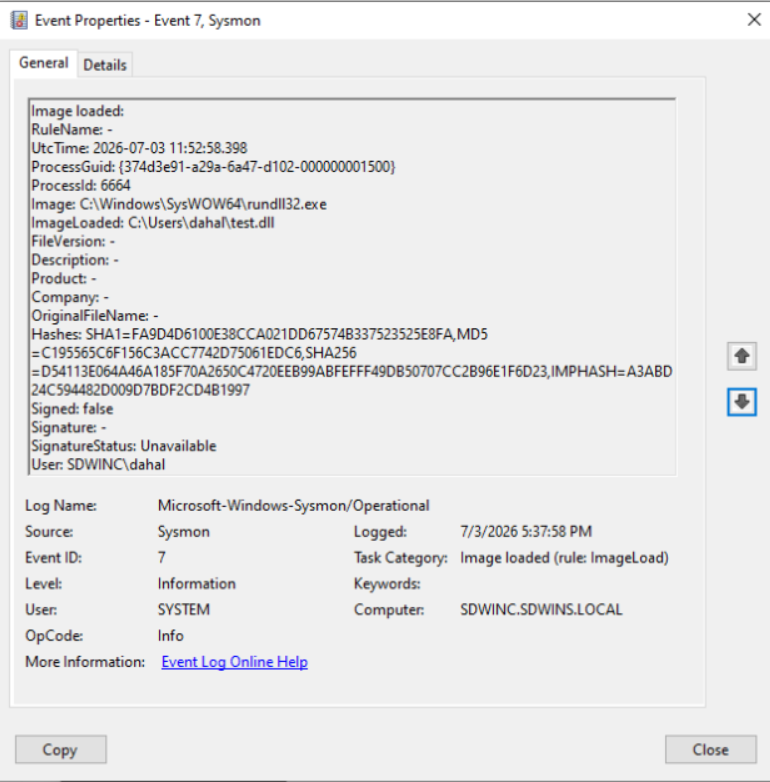
Sysmon successfully logged event ID 7 for running dll from C:\Users\dahal
From Raw Signal to a Wazuh Detection Rule
With this Sysmon config in place, we now have exactly the visibility we were missing: every time a DLL loads from outside a trusted Windows directory, an Event ID 7 log lands on the endpoint, ready for Wazuh's agent to forward. But a raw "DLL loaded from AppData" event, by itself, is a weak signal. On its own it would either flood us with false positives (legitimate apps loading their own DLLs) or, if we filter too aggressively to cut that noise, quietly let real hijacks slip through as false negatives.
This is where the Wazuh rule itself needs to do the real work. Rather than alerting on "DLL loaded from an unusual path" alone, an effective rule should correlate two things together:
-
The name of the DLL being loaded — is it a name that matches a well-known
system DLL (e.g.,
version.dll,dwmapi.dll,wtsapi32.dll,winmm.dll), the kind commonly abused in real-world DLL hijacking because many legitimate applications expect to find them without specifying a full path? - The process loading it — is the loading process itself a trusted, normally well-behaved system or signed binary that has no legitimate reason to be loading a DLL with that name from a non-system folder?
Correlating on both conditions — rather than either alone — is what keeps the rule from being too loose (catching everything and drowning the analyst in noise) or too strict (missing genuine hijacks because the filter excluded the very paths or processes an attacker chose to abuse). In the next section, we'll build this logic step by step as an actual Wazuh rule, starting with a decoder for the Sysmon Event ID 7 log format.
Configuring Wazuh To Catch DLL Hijacking
Step 1: Configure ossec.conf on the Windows agent to send Sysmon logs to the Wazuh server
Open C:\Program Files (x86)\ossec-agent\ossec.conf. This is the local
agent config, not the manager's config. Add a <localfile> block
that points at the Sysmon Operational channel. Place it inside the existing
<ossec_config> tags:
<ossec_config>
  <localfile>
    <location>Microsoft-Windows-Sysmon/Operational</location>
    <log_format>eventchannel</log_format>
  </localfile>
</ossec_config>
Now restart the Wazuh service:
net stop wazuh
net start wazuh
Step 2: Engineer the custom rule
Now let's build the actual rule step by step. The earlier parts of this article will help here. Remember that logs flow from the agent to the manager. The manager decodes each log, matches it against the ruleset, and only generates an alert if the matched rule has a level greater than 3. We will check each of these steps one at a time.
-
Tell Wazuh to store every event from the agent, not just events that match a rule.
To do this, edit the manager's
ossec.conf:vi /var/ossec/etc/ossec.conf
Inside the<global>element, find<logall>and<logall_json>. Both default tono. Change both toyes.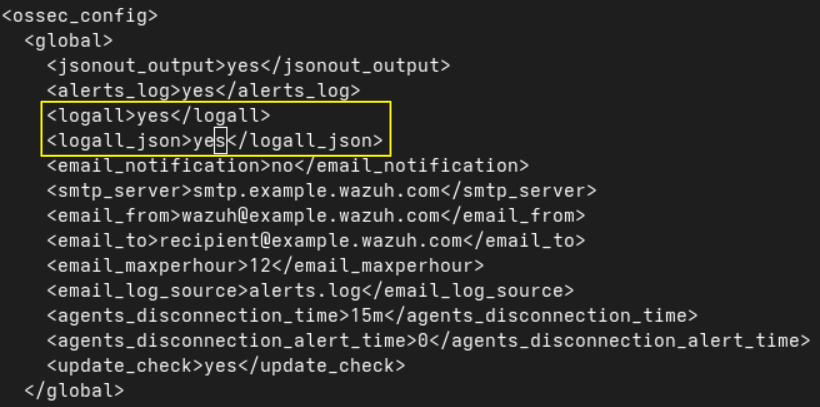
Restart the Wazuh manager after this change:systemctl restart wazuh-manager -
Check whether Sysmon events are actually reaching the Wazuh manager.
Once all events are being logged, run
test.dllfromC:\Users\dahalagain. Right after that, check whether the keywordtest.dlland"eventID":"7"appear together in/var/ossec/logs/archives/archives.logon the manager. We check for both because we want the Sysmon Event ID 7 that corresponds to our test to show up, and we triggered that event by runningtest.dll. Use this command:grep "test.dll" /var/ossec/logs/archives/archives.log | grep '"eventID":"7"' The event shows up, so this step works. The Windows agent is sending Sysmon
events to the Wazuh manager successfully.
The event shows up, so this step works. The Windows agent is sending Sysmon
events to the Wazuh manager successfully.
-
Build the rule from the ground up.
As we know, the manager first decodes the raw log into structured JSON, then
matches it against the ruleset. Custom rules go in
/var/ossec/etc/rules/local_rules.xml. We will build the rule logic gradually.-
Start with the simplest possible rule.
The simplest option is to fire an alert whenever this Sysmon event appears
at all. We can do this because our Sysmon config already filters out
everything except image loads from unprotected locations, so any Event ID 7
that reaches the manager is already worth flagging. Add this block to
local_rules.xml:<group name="sysmon,image_load,dll_monitoring,"> <!-- Base rule: any DLL load event that made it past the Sysmon exclusion filter --> <rule id="100210" level="3"> <if_group>sysmon_event7</if_group> <field name="win.system.eventID">^7$</field> <description>Sysmon: DLL loaded from a non protected directory: $(win.eventdata.imageLoaded)</description> <mitre> <id>T1574.001</id> </mitre> <group>dll_load_untrusted_path,</group> </rule> </group>Here is what
local_rules.xmllooks like now: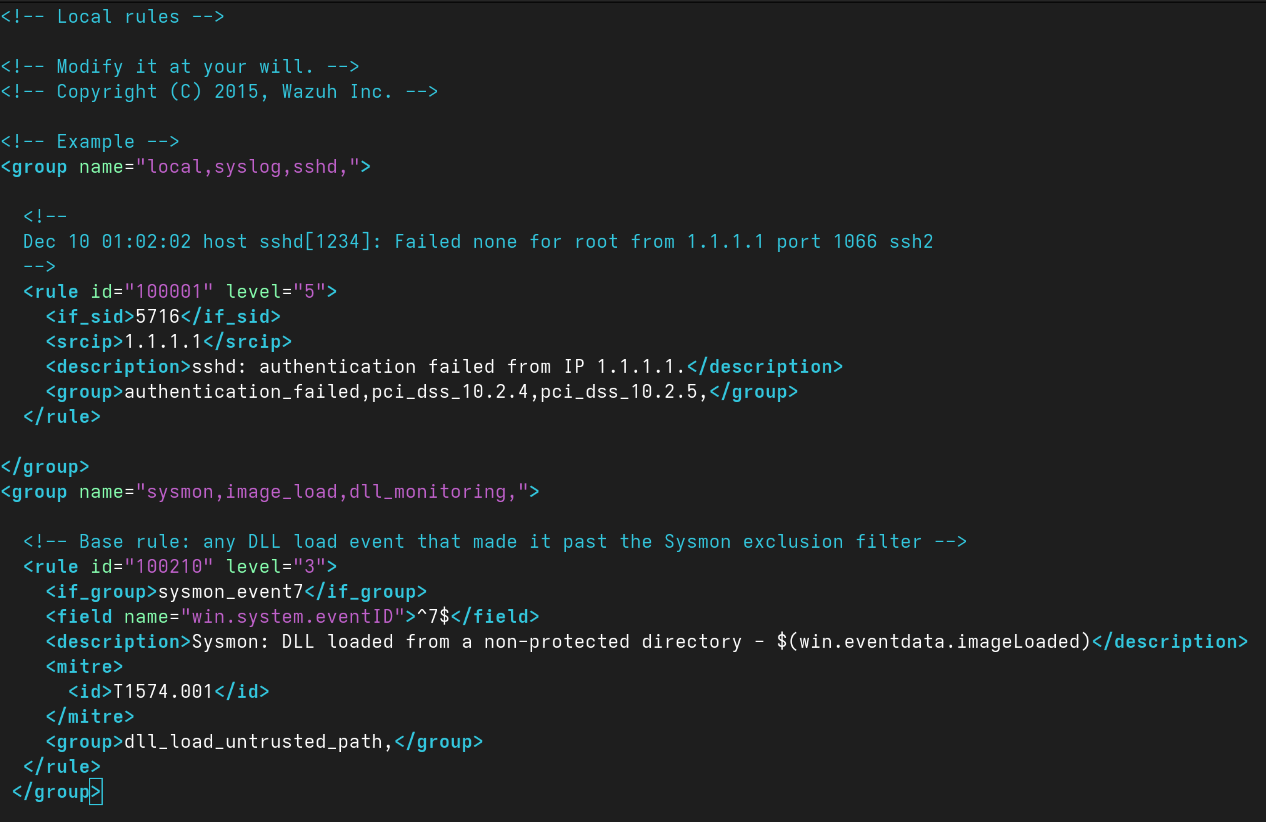
Restart the manager:
systemctl restart wazuh-manager
Then trigger the DLL load again on the Windows agent:rundll32.exe test.dll,MyEntry
Now check the Wazuh dashboard for a new alert.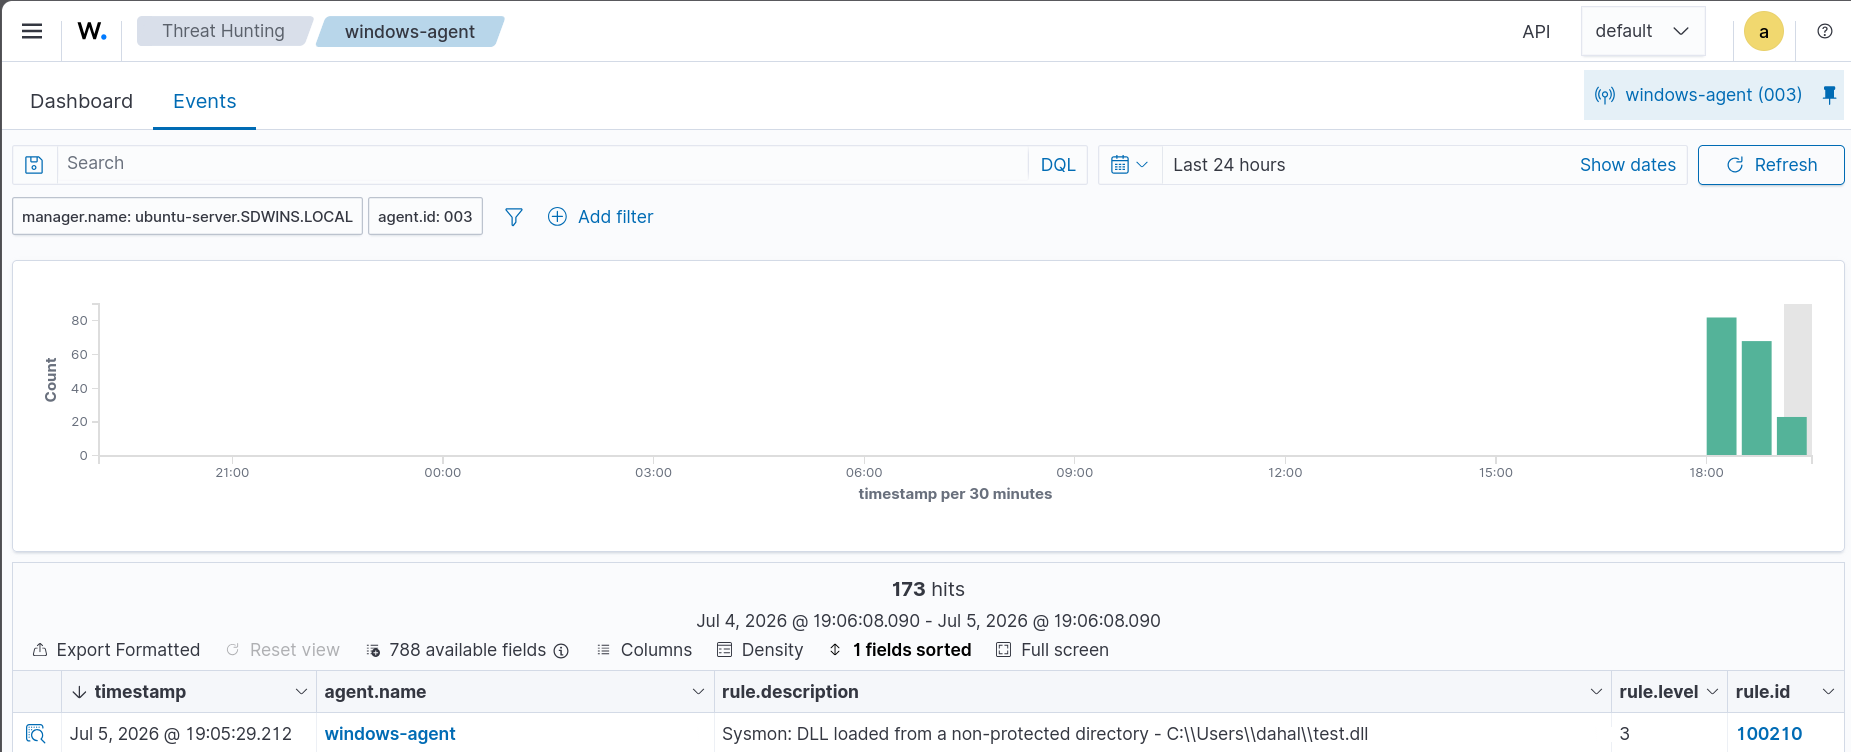
The alert appears at level 3, exactly as expected from the rule. Since we also mapped this rule to MITRE ATT&CK, we can confirm the mapping by clicking rule 100210 in the
rule.idfield on the Wazuh dashboard, then checking the Compliance tab.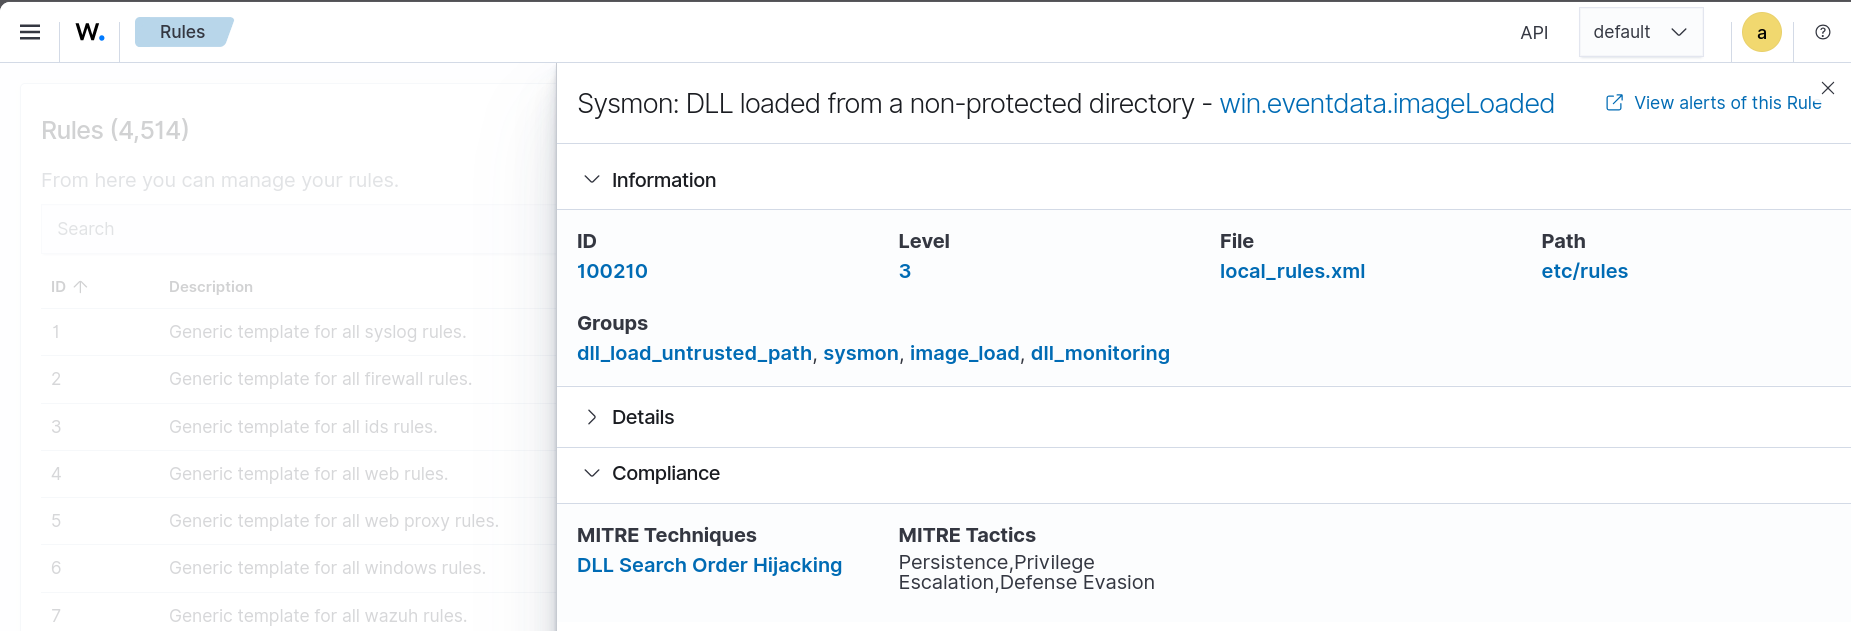
-
Start with the simplest possible rule.
The simplest option is to fire an alert whenever this Sysmon event appears
at all. We can do this because our Sysmon config already filters out
everything except image loads from unprotected locations, so any Event ID 7
that reaches the manager is already worth flagging. Add this block to
We now have a basic working rule. Before we expand it further, let's step back and look at how a Wazuh rule is actually structured, and what to do when something goes wrong with rule testing.
Anatomy Of a Wazuh Rule
Before getting into the components that make up a rule, let's clear up some terminology confusion. In every XML config file we see a lot of text within angle brackets (<>). So what are these called?
- <abc z="a">Content</abc> -> Here abc is the tag name. It has an opening tag (<abc>) and a closing tag (</abc>). z is called an attribute of the tag, and "a" is that attribute's value. The text sitting between the opening and closing tags (Content) is called the element's content. The entire thing — tag + attributes + content — is called an element in strict XML terminology, but in Wazuh this is informally called a field.
-
For example:
Breaking this down with the terms above:<group name="sysmon,image_load,dll_monitoring,"> <!-- Base rule: any DLL load event that made it past the Sysmon exclusion filter --> <rule id="100210" level="3"> <if_group>sysmon_event7</if_group> <field name="win.system.eventID">^7$</field> <description>Sysmon: DLL loaded from a non protected directory: $(win.eventdata.imageLoaded)</description> <mitre> <id>T1574.001</id> </mitre> <group>dll_load_untrusted_path,</group> </rule> </group>- rule is the tag name of the outermost element inside group. Its attributes are id and level, with values "100210" and "3". Wazuh custom rules must be assigned id greater than 100000.
- <if_group>sysmon_event7</if_group> is a field (element) whose content, sysmon_event7, tells this rule it only applies if the event already matched one of those parent groups. Here sysmon_event7 is a out of the box rule group in Wazuh. Our custom rule triggers only if this parent rule matches.
- <field name="win.system.eventID">^7$</field> shows a tag with an attribute (name, value "win.system.eventID") and content (^7$, a regex). Here the element's own tag name happens to literally be "field," which is Wazuh's way of checking one specific decoded data point. This rule says if the decoded JSON has a key named win.system.eventID(a nested key) with value 7, then trigger the rule. We will see this exact decoded JSON key a bit later using 'logtest'.
- <description>'s content is the human-readable text shown in the alert, including the $(win.eventdata.imageLoaded) placeholder, which Wazuh substitutes with the actual decoded value at alert time.
- <mitre> is a field containing a nested child field, <id>, whose content T1574.001 maps this rule to a MITRE ATT&CK technique.
- The second, unnamed <group>dll_load_untrusted_path,</group> is a field whose content adds an extra classification tag to this specific rule, separate from the outer <group name="..."> wrapper that contains the whole rule file section.
Now let's expand this rule and see how to test/debug a rule in Wazuh
Expanding the rule
We will expand this rule to add two more things to this rule:
- Known-abused system DLLs(version.dll, dbghelp.dll, dbgcore.dll, winmm.dll, dwmapi.dll, uxtheme.dll, amsi.dll, msimg32.dll, wbemcomn.dll, ualapi.dll, cryptsp.dll, profapi.dll, ntshrui.dll, oleacc.dll, windowscodecs.dll, propsys.dll, wtsapi32.dll etc) loaded from outside System32/SysWOW64 regardless of signed status. We will give this rule id 100213 and a high level of 12.
- Signed by Microsoft, but not caught by rule 100213(generic/app-specific DLL), from odd path
The rule will now look like follows:
<group name="sysmon,image_load,dll_monitoring,">

  <!-- Base rule: any DLL load event that made it past the Sysmon exclusion filter -->
  <rule id="100210" level="3">
    <if_group>sysmon_event7</if_group>
    <field name="win.system.eventID">^7$</field>
    <description>Sysmon: DLL loaded from a non-protected directory - $(win.eventdata.imageLoaded)</description>
    <mitre>
      <id>T1574.001</id>
    </mitre>
    <group>dll_load_untrusted_path,</group>
  </rule>

  <!-- HIGHEST: known-abused system DLL name loaded from outside System32/SysWOW64 -->
  <!-- Regardless of signed status - this is the classic hijack/sideload pattern -->
  <rule id="100213" level="12">
    <if_sid>100210</if_sid>
    <field name="win.eventdata.imageLoaded" type="pcre2">(?i)\\(version|dbghelp|dbgcore|winmm|dwmapi|uxtheme|amsi|msimg32|wbemcomn|ualapi|cryptsp|profapi|ntshrui|oleacc|windowscodecs|propsys|wtsapi32)\.dll$</field>
    <description>Sysmon: Possible DLL search-order hijacking - known system DLL name "$(win.eventdata.imageLoaded)" loaded outside System32/SysWOW64</description>
    <mitre>
      <id>T1574.001</id>
      <id>T1036.003</id>
    </mitre>
    <group>dll_hijack_suspected,</group>
  </rule>

  <!-- Signed by Microsoft, but not caught by rule 100213 (generic/app-specific DLL), from odd path -->
  <rule id="100214" level="8">
    <if_sid>100210</if_sid>
    <field name="win.eventdata.signed">^true$</field>
    <field name="win.eventdata.company" type="pcre2">(?i)Microsoft</field>
    <description>Sysmon: Microsoft-signed DLL loaded from non-protected directory - $(win.eventdata.imageLoaded)</description>
    <group>dll_load_ms_signed_odd_path,</group>
  </rule>

</group>
We have already discussed the base rule here. Other two rules are chained to this rule. We call this chained rule. You can see
in rule id 100213, there is a field named if_sid with with content 100210. This simply means, 'Rule 100213 will match only if rule 100210 fires'.
Similar thing happens in rule id 100214. We have already discussed the field name, description and Mitre fields. What we will do now is
see the decoded JSON and how the rule matches the value associated with the key and generate alert using a very important tool in
Wazuh called wazuh-logtest(/var/ossec/bin/wazuh-logtest)
Using wazuh-logtest to see the decoder and rule in action
Before we go about checking the rule, we need to figure out something; How do we actually run known-abused system DLL from outside System32/SysWOW64. Windows has a decent protection against these sort of things. Attackers mostly make an executable which calls certain functions of these DLLs and they place a malicious dll in the same directory as that of the executable so dll search order can be hijacked.
We will create a executable file using C which invokes a function called GetFileVersionInfoSizeA, which is a genuine function in version.dll file used to determine the size of a file's version information block before actually retrieving it in windows. But we will make our own version.dll and place it in the same location where our executable file is located so that our malicious version.dll will be loaded. This is exactly what dll hijacking is.
I should preface this with saying this is for educational purposes only. First let's create a malicious version.dll.
Create a file and name it main.c:
#include <windows.h>
#include <stdio.h>

int main()
{
    DWORD handle = 0;

    GetFileVersionInfoSizeA("C:\\Windows\\notepad.exe", &handle);

    printf("Done\n");
    return 0;
}
This code simply calls the function GetFileVersionInfoSizeA on C:\Windows\notepad.exe. This looks innocent because it is simply
trying to determine the size of notepad.exe's version information block. But there is a problem, it does not specify the
absolute path of GetFileVersionInfoSizeA function. So if we place a malicious version.dll with this function defined, then
this program will run the malicious GetFileVersionInfoSizeA function. Let's write a malicious version.dll.
Create a file and name it version.c
#include <windows.h>

BOOL WINAPI DllMain(HINSTANCE hinstDLL,
                    DWORD fdwReason,
                    LPVOID lpReserved)
{
    if (fdwReason == DLL_PROCESS_ATTACH)
    {
        MessageBoxA(NULL,
                    "My version.dll was loaded!",
                    "DLL Hijack Test",
                    MB_OK);
    }

    return TRUE;
}

DWORD WINAPI GetFileVersionInfoSizeA(
    LPCSTR lptstrFilename,
    LPDWORD lpdwHandle)
{
    return 0;
}
This code will simply print a message "My version.dll was loaded", "DLL Hijack Test" in a message box if GetFileVersionInfoSizeA function is called. But, you get the idea, we can make it do all sorts of things.
Now create version.def:
LIBRARY version

EXPORTS
    GetFileVersionInfoSizeA
Now we will compile everything. Run(in Developer Command Prompt using Visual Studio):
cl /LD version.c user32.lib /link /DEF:version.def -> This creates a version.dll
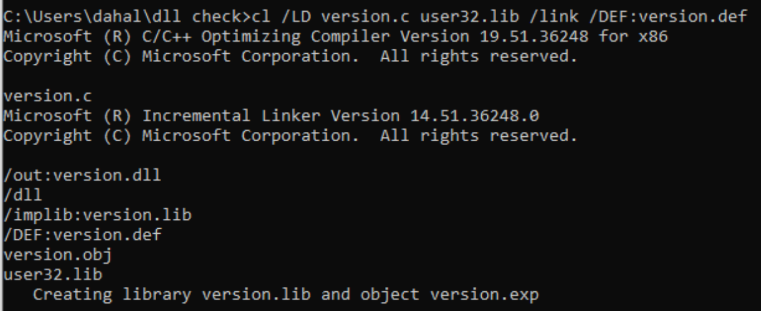
cl main.c Version.lib-> This will create a main.exe
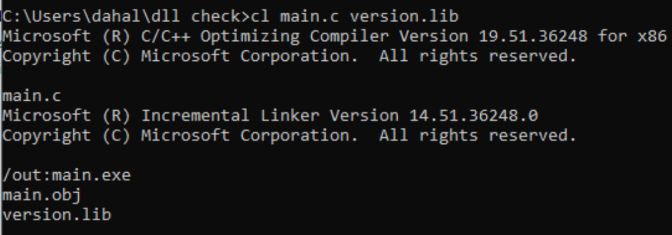
After running these you should get the following files
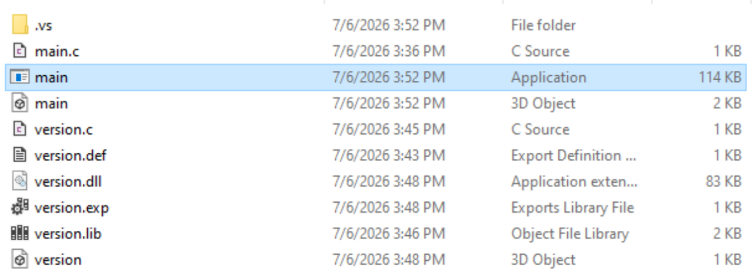
Now simply double click on main.exe to run the executable. This will then run the GetFileVersionInfoSizeA
function from the malicious version.dll.
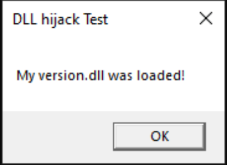
This will trigger a alert with level 12 in Wazuh.
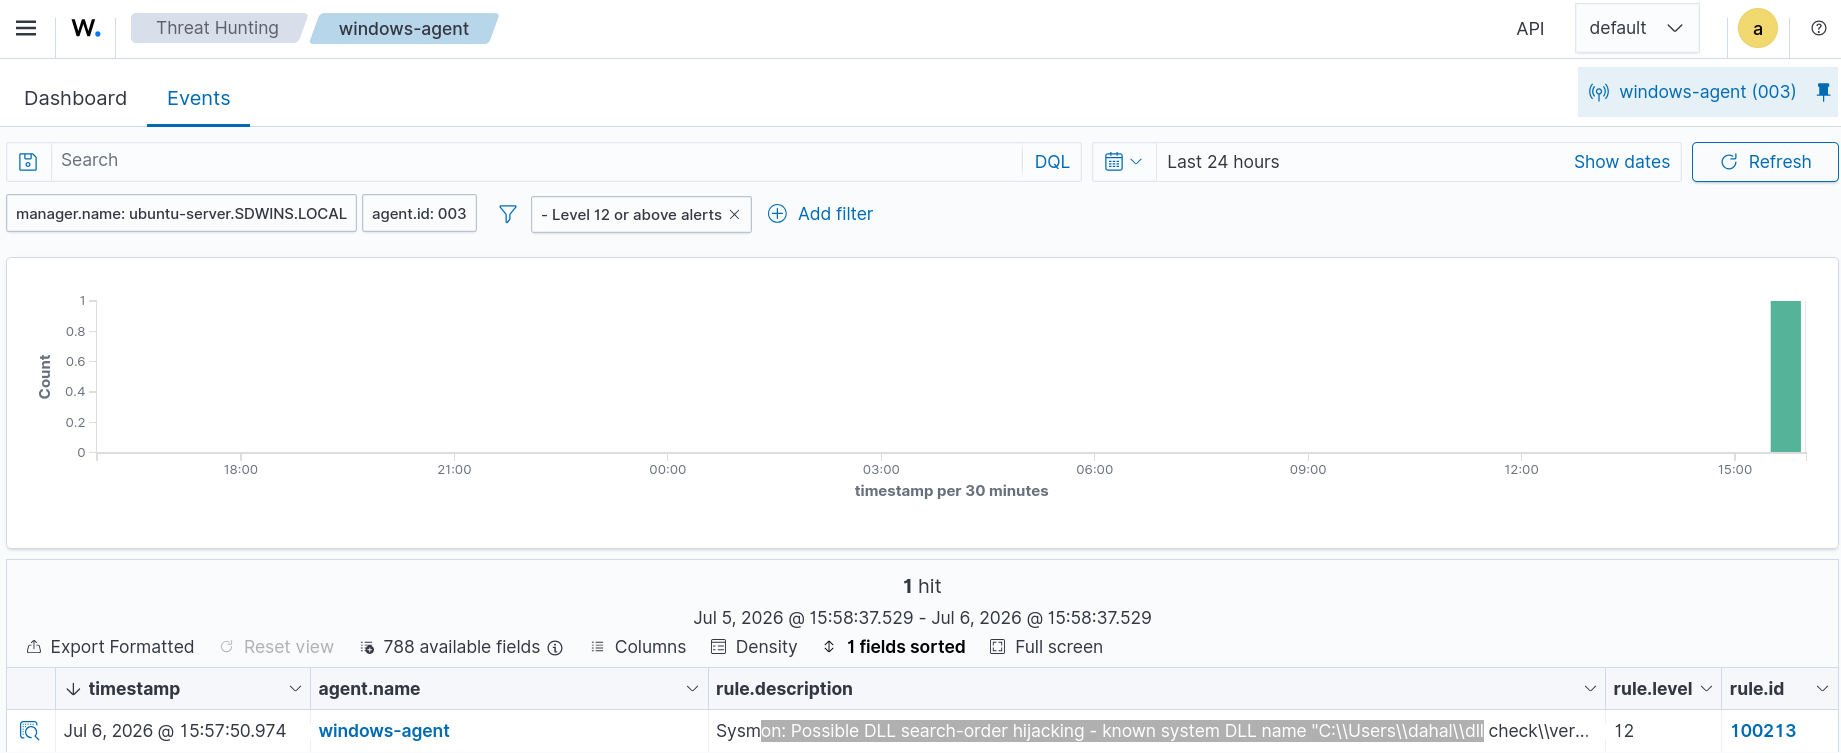
Nice! the rule works, but the point of this section is to introduce wazuh-logtest. Let's see how to use logtest to debug a rule and
also check if the rule is working as intended. To use wazuh-logtest we need the raw logs that we saw in /var/ossec/logs/archives.log.
So let's run main.exe again and in the wazuh-server run grep -i "version.dll" /var/ossec/logs/archives/archives.log.

This log has an envelope(metadata), which is not part of the decoder input, so copy only the highlighted log below:

Now run /var/ossec/bin/wazuh-logtest and paste in the copied log.
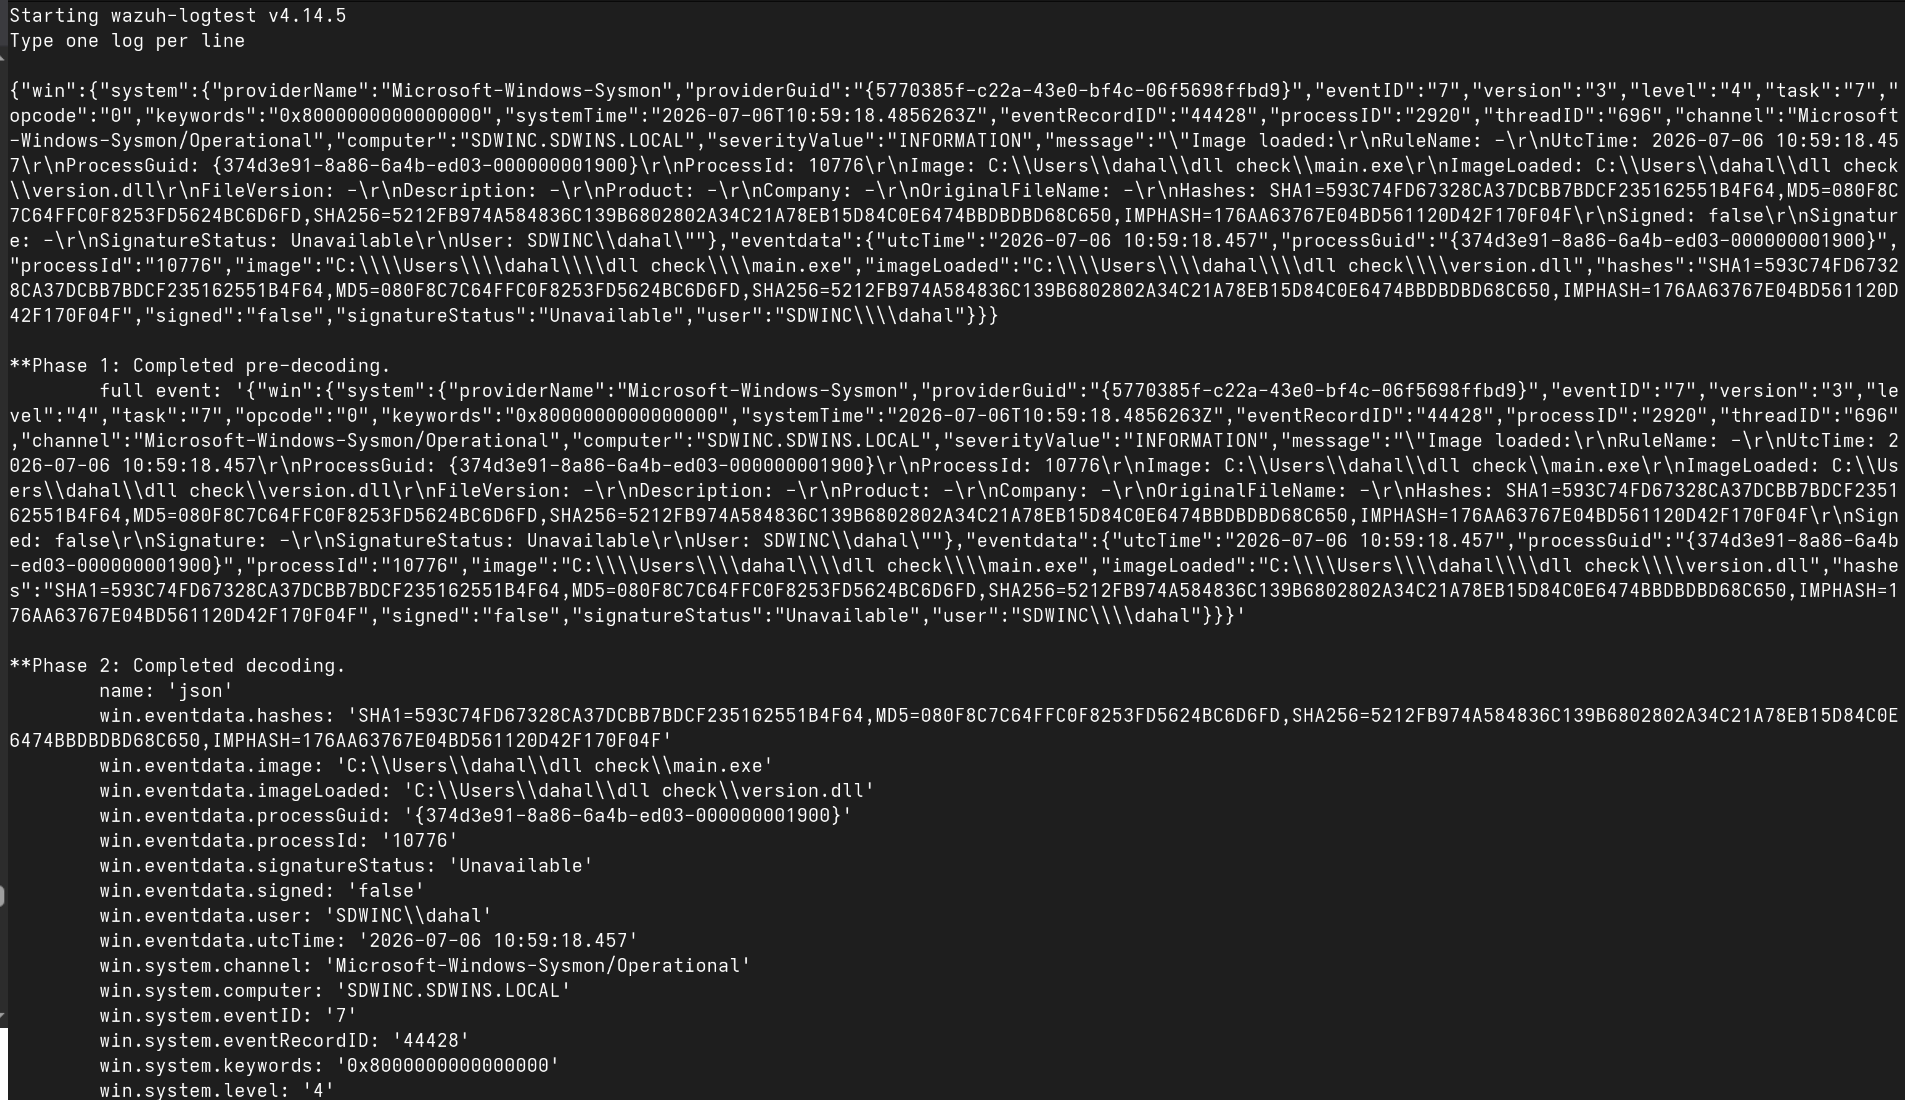
You can see the different processing phases here. Most importantly, look at the output of **Phase 2**, where Wazuh has successfully decoded the JSON event. All of the fields extracted from the event are listed, including values such as win.system.eventID: '7' and win.eventdata.imageLoaded: 'C:\Users\dahal\dll check\version.dll'. These are the exact fields referenced by our custom rule and are the values that ultimately produce the alert we saw in the Wazuh dashboard.
One thing you might notice is that the output stops after **Phase 2**. We never see **Phase 3: Completed filtering (rules)**. At first glance, this may suggest that our rule is incorrect, but that is not the case.
Our base rule begins with:
<if_group>sysmon_event7</if_group>
This means the rule is evaluated only if the event has already been assigned to the sysmon_event7 group by Wazuh's decoder chain.
When we paste the raw Sysmon JSON directly into wazuh-logtest, the event is decoded using the generic JSON decoder. This is why Phase 2 correctly extracts all of the JSON fields that our rule references. However, because the event is not processed through the normal EventChannel and Sysmon decoder chain, it is never assigned to the `sysmon_event7` group. Since the prerequisite group is missing, the rule engine has no matching rule to evaluate, and Phase 3 never completes.
You might wonder whether prepending the metadata shown in archives.log or archives.json, for example:
2026 Jul 06 16:44:20 (windows-agent) any->EventChannel
would solve the problem. It does not. That prefix is not part of the original Windows event—it is
metadata added by Wazuh when the event is stored.
The Wazuh manager already knows the agent, log location, and source internally when it receives an event.
Simply pasting that text into wazuh-logtest does not recreate the internal processing context,
so the EventChannel decoder chain is still not invoked.
In a real deployment, the process is different.
The Windows agent forwards the Sysmon event together with its source information.
The Wazuh manager recognizes that the event originated from the Microsoft-Windows-Sysmon/Operational
EventChannel, processes it through the EventChannel and Sysmon decoders, assigns the sysmon_event7 group,
and finally evaluates all rules that depend on that group.
Under those conditions, our custom rule is evaluated normally and generates the expected alert.
Therefore, the absence of Phase 3 in this particular wazuh-logtest scenario should not be interpreted as a
problem with the custom rule. It is simply a limitation of testing isolated Sysmon JSON outside of Wazuh's normal event
processing pipeline.
Integrations: VirusTotal, Slack, PagerDuty
PLACEHOLDER — integrations
VirusTotal integration for file hash lookups on FIM events.
Slack/webhook integration for alert notifications.
PagerDuty or OpsGenie for on-call alerting.
How to configure <integration> blocks in ossec.conf. Using the Wazuh API.
Tuning & Reducing Alert Noise
PLACEHOLDER — tuning
This is where most real-world Wazuh work happens. Strategies: raising rule levels, adding ignore rules,
fine-tuning FIM exclusions, whitelisting known-good IPs, suppressing noisy built-in rules.
Using the Ruleset Testing tab. Setting minimum alert level for notifications.
Dashboard saved searches and alert thresholds.
Troubleshooting & Useful Commands
PLACEHOLDER — troubleshooting
Common issues: agent not connecting, indexer out of disk, rules not firing.
Key log files: /var/ossec/logs/ossec.log, alerts.log, api.log.
Useful commands: agent_control, wazuh-logtest, cluster_control, wazuh-indexer health checks.
Restarting services: systemctl restart wazuh-manager / wazuh-dashboard / wazuh-indexer.
Frequently Asked Questions
Is Wazuh a SIEM or an XDR?
Wazuh combines SIEM, HIDS, EDR, and XDR capabilities into a single open-source security platform. It performs log collection, threat detection, vulnerability management, file integrity monitoring, and active response.
Is Wazuh free to use?
Yes. Wazuh is completely open source and can be deployed without licensing costs. Organizations can run Wazuh on-premises or in cloud environments.
What ports does Wazuh use?
Wazuh agents communicate with the manager using TCP port 1514 for event forwarding and TCP port 1515 for agent enrollment. The dashboard typically uses HTTPS on port 443 and communicates with the Wazuh API on port 55000.
What is the difference between Wazuh Manager and Wazuh Indexer?
The Wazuh Manager receives logs, decodes events, applies rules, and generates alerts. The Wazuh Indexer stores those alerts in OpenSearch and makes them searchable through the dashboard.
What database does Wazuh use?
Wazuh primarily uses an embedded SQLite database for local endpoint tracking and the OpenSearch search and analytics engine for storing and visualizing security events globally.
Can Wazuh monitor Windows and Linux systems?
Yes. Wazuh agents are available for Windows, Linux, and macOS. The platform can collect logs, monitor files, detect vulnerabilities, and perform security monitoring across all supported operating systems.
What is File Integrity Monitoring in Wazuh?
File Integrity Monitoring (FIM) tracks changes to important files and directories. Wazuh detects file creations, modifications, deletions, permission changes, and ownership changes that may indicate malicious activity.
Can Wazuh detect brute-force attacks?
Yes. Wazuh includes built-in rules that detect repeated failed authentication attempts against services such as SSH, RDP, and web applications. Alerts can be correlated across multiple systems.
Does Wazuh support MITRE ATT&CK?
Yes. Many Wazuh rules are mapped to MITRE ATT&CK tactics and techniques, allowing security teams to understand attacker behavior and improve threat hunting activities.
What is Syscollector in Wazuh?
Syscollector is a Wazuh module that gathers inventory information from monitored endpoints, including installed software, operating system details, hardware information, network interfaces, and running processes.
How much RAM does Wazuh need?
Resource requirements depend on the number of monitored agents and event volume. A small home lab can run on a few gigabytes of RAM, while enterprise deployments often require dedicated manager, indexer, and dashboard nodes with significantly more resources.
How does Wazuh vulnerability detection work?
The Syscollector module inventories installed software and operating system information. The Vulnerability Detection module compares that inventory against vulnerability intelligence from the Wazuh CTI platform and generates alerts for affected packages.